Integration Assignment
| CIT105P Rubrics | |
| Assignment 9: Integration | |
| WP | 3 |
| Spreadsheet Table | 3 |
| Image | 3 |
| Seamlessness | 1 |
| Total | 10 |
1. Create the document as shown in Figure 1 below. Your document doesn't have to look exactly like the image below, but you should include the following steps (underneath the illustration).
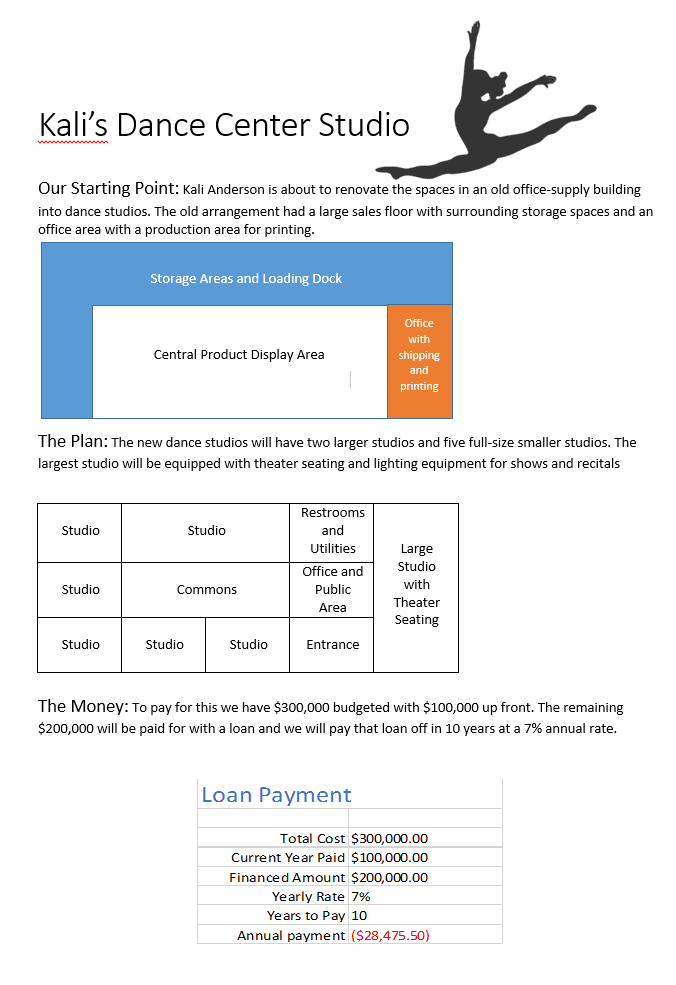
What you need to show for this assignment
Creating your skills integration assignment using Microsoft Word
- Insert a clipart image in the upper right-hand side.
- Draw the existing floor plan using shapes
- Draw the new floor plan for the studio using a table
- Create a spreadsheet embedded within Word using the (third) method shown below (via insert/table/spreadsheet)
- You are invited to explore two other methods (cut & paste and linking) but should not use them for the assignment (points off if you do)
- Use a the Calibri font at 11 points for the body text and 14 points for the larger topic text.
- Use the Title style from home/styles on the ribbon for the top line
Hints, Tips and Directions
How to put this together - tips are below.
Adding Clip Art
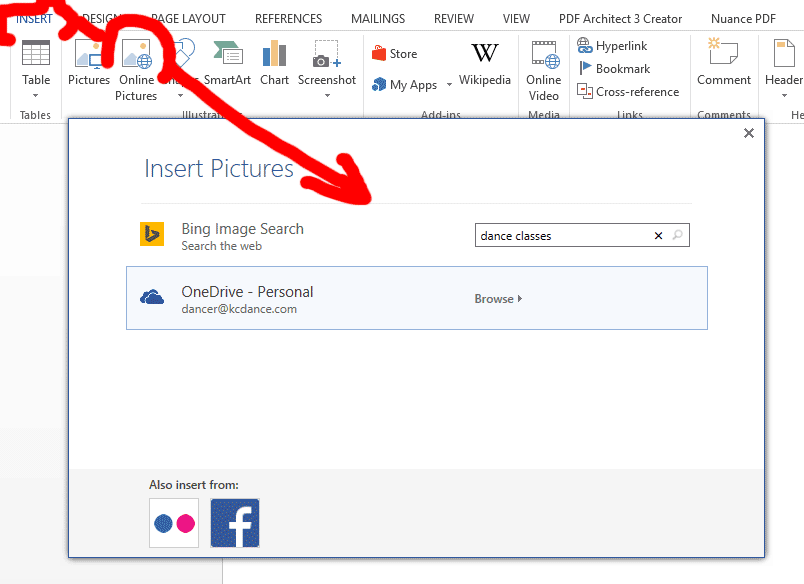
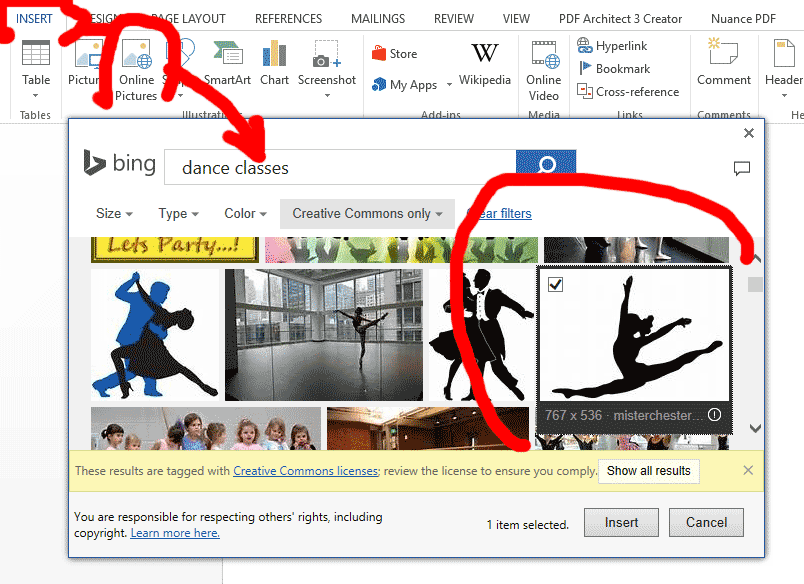
Drawing with Shapes
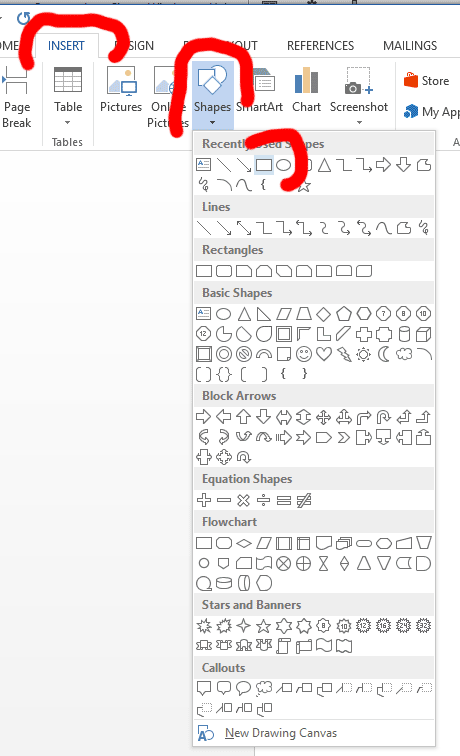
Click on the "INSERT" tab, then the "Shapes" pulldown icon and pick the shape you want from the gallery. After that drag the cursor to draw it on the document.
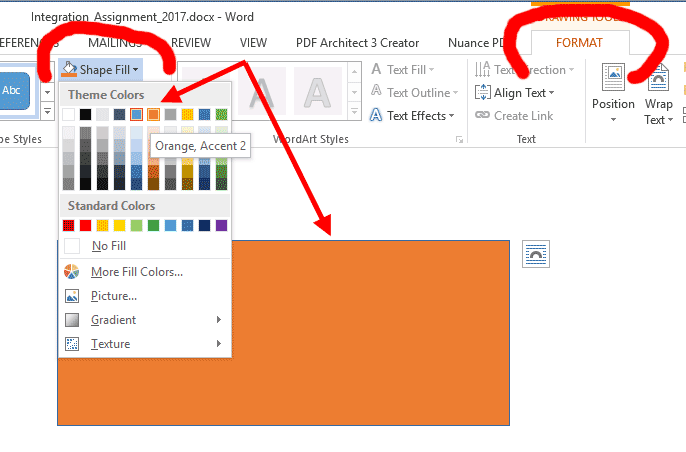
Set or change the background color by clicking on the pull down "Shape Fill" menu and picking a color. As your cursor hovers over any of those color patches the background will change to give you a preview.
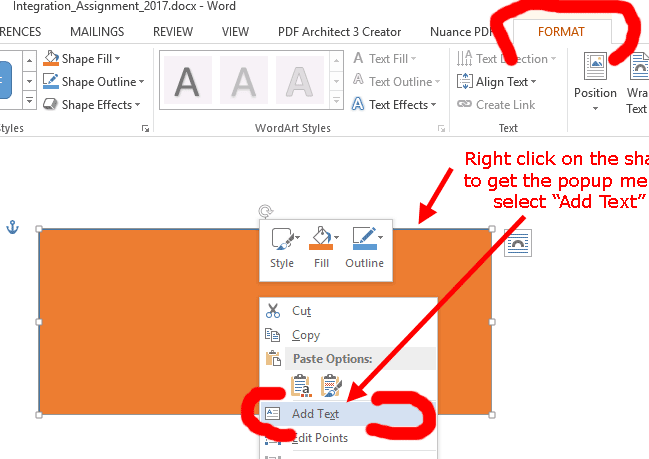
You can add text to a shape by right-clicking on the shape to get the popup menu. The pick the "Add Text" option to start entering your text in the middle of the shape.
Creating a Table
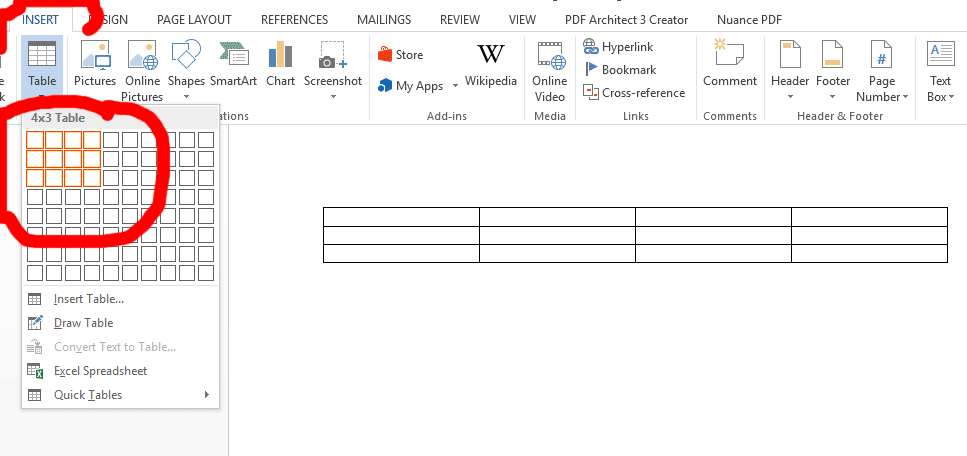
To insert a table move your cursor over the cell-configuration panel to generate a table with the number of rows and columns you are hovering over.
When done here use the handles to resize your table.
To merge cells, highlight more than one cell next to each other then right cick to get a menu with options to merge the highlighted cells.
You can place text in a cell merely by placing your cursor in that cell and start typing.
Adding a Spreadsheet Within a Word Document - 3 Methods
There are three are three basic ways to place the results of a spreadsheet in Word.
1 - Copy and Paste
2 - Link to an Excel file
3 - Insert as a working table in Word (use this third method, only, for the assignment, if you want the points)
Below is an explanation of all three methods. Use only the LAST ONE for your assignment. The others are presented because they are useful and often very useful. It is just that there is no way for us to see the formulas in the spreadsheet for the first two methods.
Here they are.
1 - Copy and Paste. (don't do this for the assignment, you will be graded down)
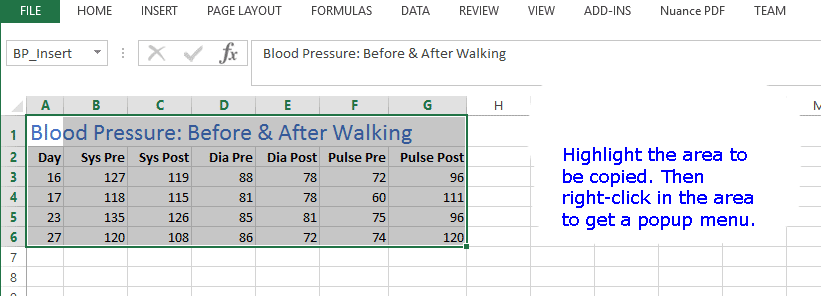
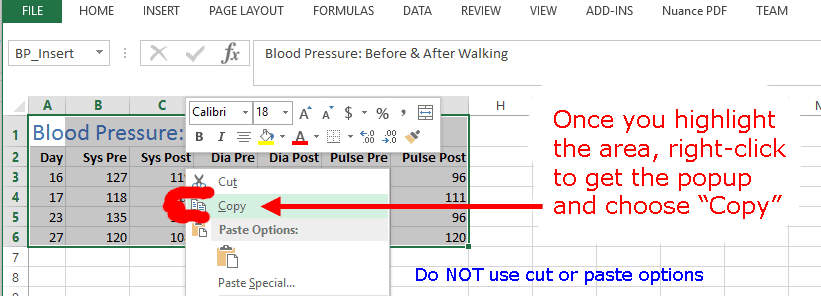
Here you highlight an area on your spreadsheet and copy the area (i.e. Control-C, or right-click/copy),
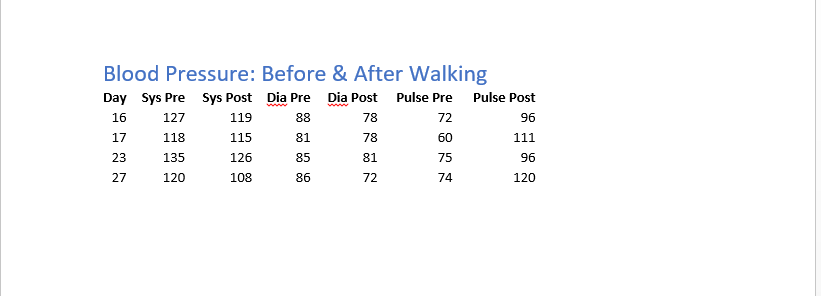
then, in Word, paste (right-click/paste or Control-V)This creates a table with the contents from the spreadsheet. There is, however, nothing that can be done with this in Word other than to look at it. Most of the time this is fine. But it loses the ability to update the information. Also, because we can't see the spreadsheet work (formulas) this is not okay for a graded assignment.
The result of a copy from spreadsheet to a paste operation in Word. This shows up as data in table format but only as information typed in. Again DO NOT use this method in the assignment though you might wish to use it for other documents you prepare.
2 - From Word, Link to your Excel spreadsheet (also don't do for class, too many things to go wrong)
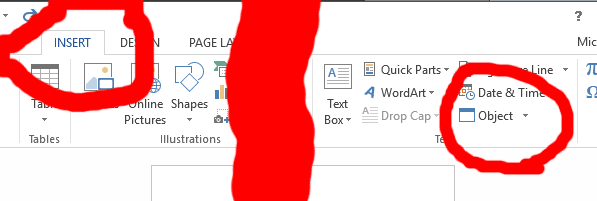
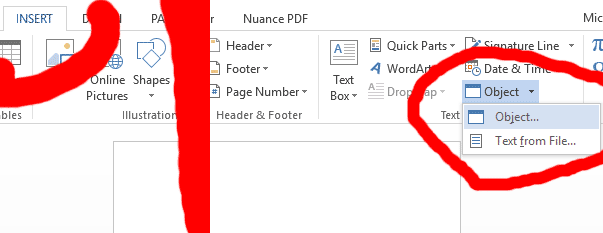
1 - On the "INSERT" tab click on the "Object" pull-down list item on the left side of the ribbon.
2 - In the pull-down list choose the "Object" option
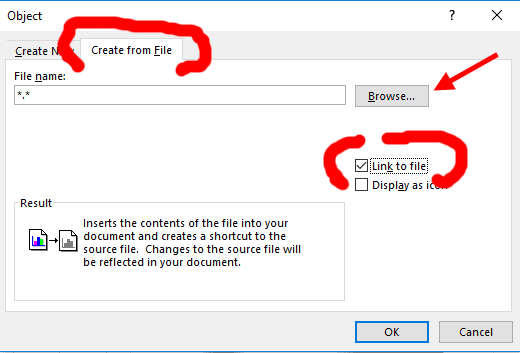
3 - Click on the "Create from File" tab (The "Create Name" tab will be shown first)
4 - Check the "Link to file" checkbox
5 - Click on the "Browse" button
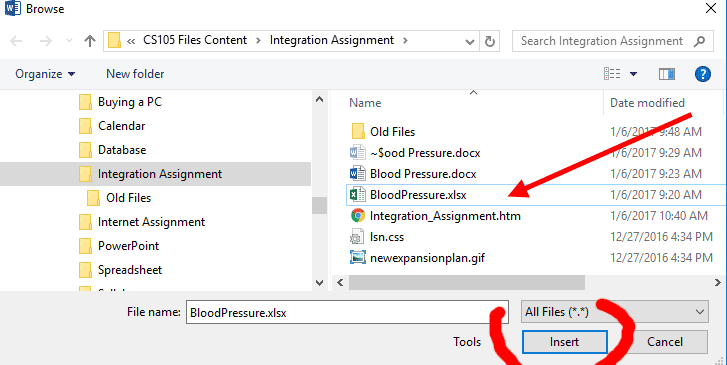
6 - In the file dialog for the linked object, locate your file (in this case BloodPressure.xlsx), then click "Insert"
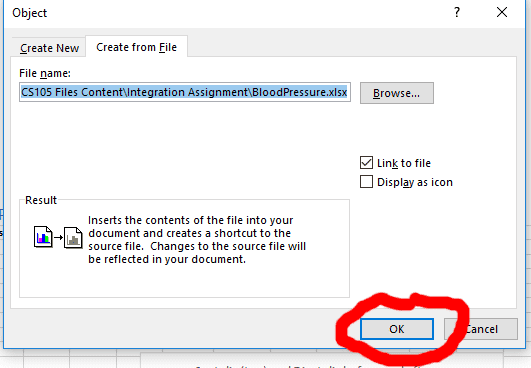
7 - This brings us back to the "Object" dialog - Click the "OK" button.
`
8 - Resulting look of a linked spreadsheet.
9 - To change values in the spreadsheet from Word, double click on the linked object and Excel will be brought up for you to work in.Among the reasons we didn't want to use this method for the assignment (although shown here because this can be very handy) is that you need to send both the Word file and the Spreadsheet file together to work, although this doesn't always maintain the link. If you send only the Word file the spreadsheet will only show as a table and you can't see any formulas in the spreadsheet.
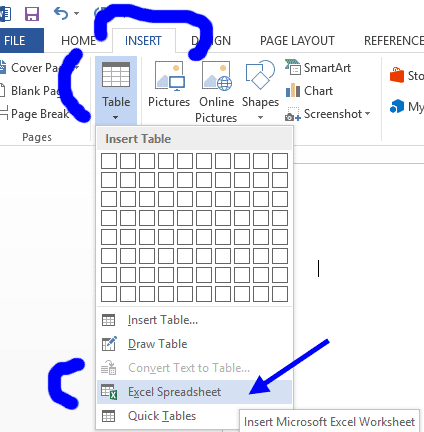
3 - Within Word, From the Insert-tab/Table-icon choose the Excel spreadsheet option
(USE THIS METHOD for the assignment)
1 - Click on the "INSERT" tab
2 - Click on the "Table" pull-down list item
3 - Choose the "Excel Spreadsheet"
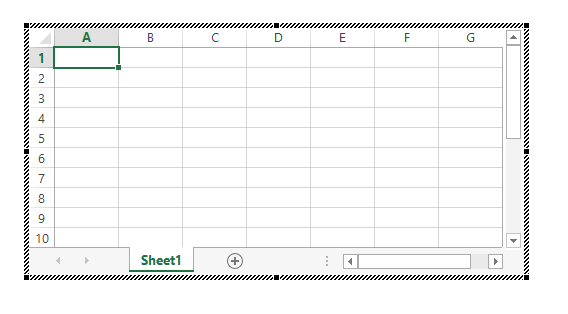
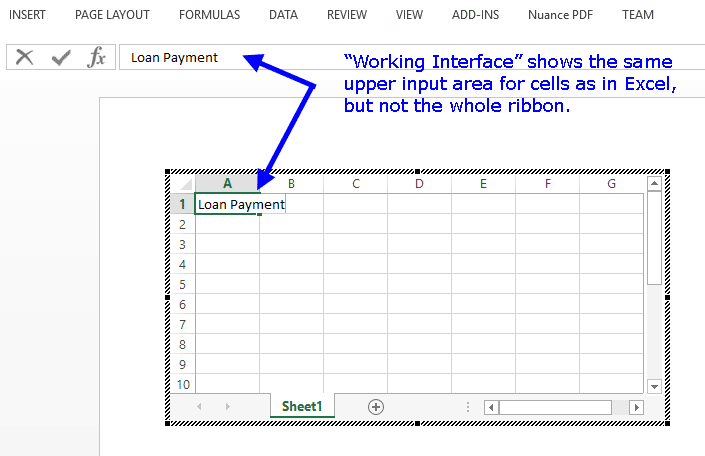
4 - Now you have a working spreadsheet within Word. When it looks like this you are able to enter formulas, text and numbers, just like and spreadsheet. What you don't have is the full interface. You will have to know Excel well enough that you can enter formulas directly. If you are not sure, you might also start this in Excel and then re-type them here.
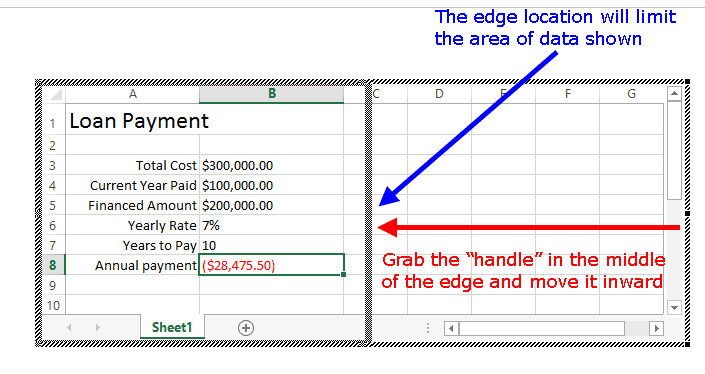
Hint - This is a full size spreadsheet. You just are not seeing all the cells in this window. You can trim the cells you show to just the information you want by using the outside "handles" to grab the spreadsheet display and adjust the size which is shown. To change the scale (larger/smaller) size use the window below.
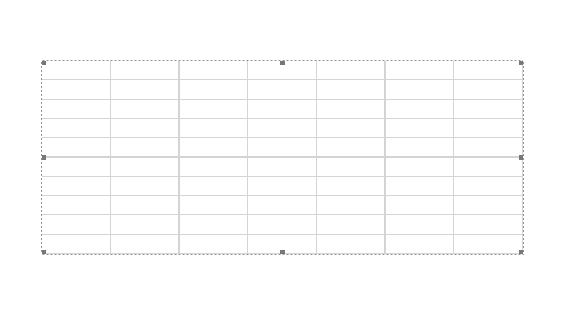
5 - This is the same (still blank) working spreadsheet but as it looks when you've moved the cursor outside the worksheet boundaries. This is the way it will print out. You can use the handles to scale the contents, larger or smaller, on the page. If you wish to change which part of the spreadsheet shows and how much you need to use the working interface shown in the illustration above this one.6 - To return to the working spreadsheet within Word, double click in the SS/table area. You will get the interface shown above. In some cases it may take a couple of seconds to get there.
Your working interface for an embedded spreadsheet in Word. When you see the hashed boundaries and the scroll bars with the Excel input box at the top you know that you can enter formulas into this just as if you were in Excel.
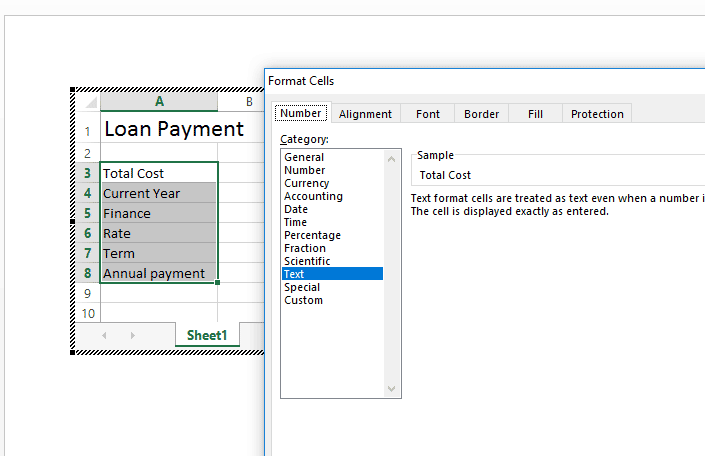
Enter text and format the text cells by right-clicking on the highlight area and choosing "Format Cells"
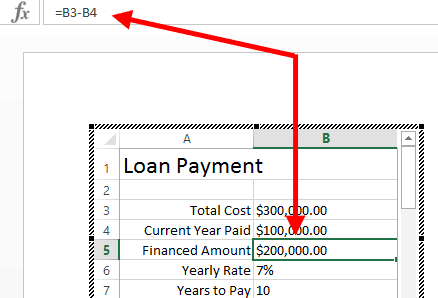
Note that the Financed Amount is a formula derived by subtracting the Current Year Paid (cell B4) from Total Cost (cell B3)
Also note that between illustrations we've changed the descriptive text.
Enter starting values.
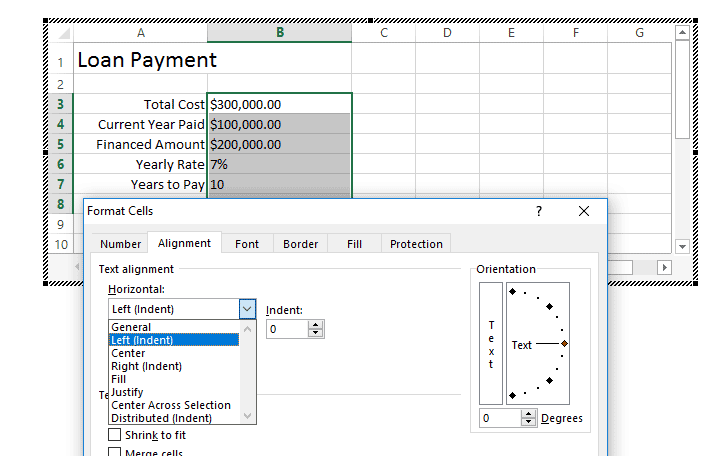
Format the cells for Currency, Percentage and Number and also left-align the cells
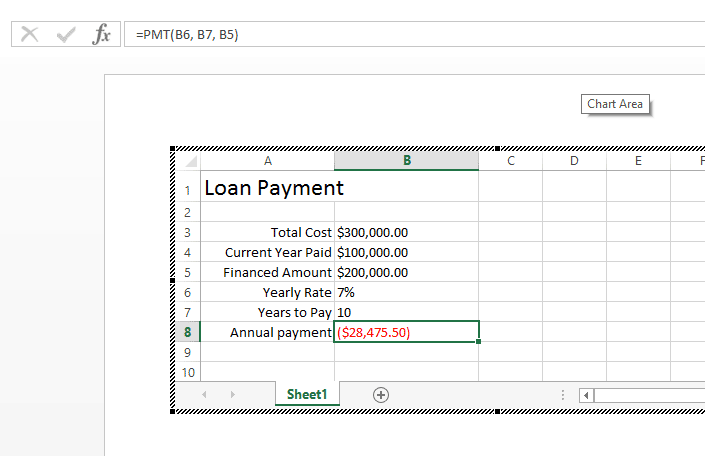
Note that we are using the exact same function (PMT) as we used in the loan calculator spreadsheet exercise.
- Points
- Total Cost is the full cost of the loan
- Current Year Paid is the payment to me made right away
- Financed Amount is the part of the full cost we are getting the loan for. This is the Principal (cell B5)
- Yearly Rate is the percent of interest to pay each year (cell B6)
- Years to Pay is the "term" or the amount of time to pay down the loan (cell B7)
- Annual payment is where you will enter the formula (which you can see at the top) (cell B8)
- Notice we do not multiply or divide anything by 12 because we are showing yearly, not monthly
- Note also that the total cost is not used in the PMT function because the loan is for less.
Now Trim the spreadsheet to the data
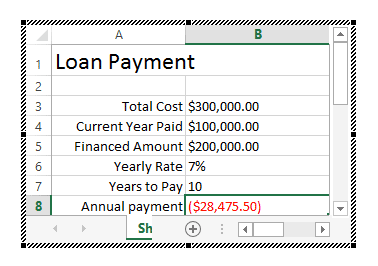
Here is the trimmed spreadsheet, still in working mode (with hatched borders)
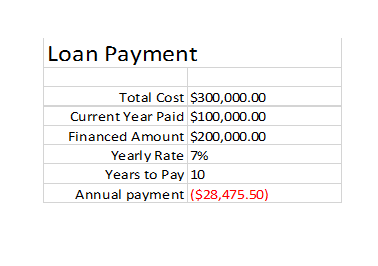
The trimmed spreadsheet as embedded in Word. This is the display mode and is what this part of your document should look like.In "PAGE LAYOUT" tab set "Align to Page" and in "HOME" tab set the paragraph alignment to "Centered" This will move the spreadsheet embedment to the center of the page at its current top-to-bottom location.
