CS105P
Assignments 2a (top) and 2b (bottom, extra credit)
Word Processing Styles - Assignment 2a, Invitation Flyer
| CIT105P Rubrics | |
| Assignment 2: Word Processing 2a (flyer) | |
| Insert image at top center | 2 |
| Create two columns | 2 |
| Set paragraphs to hanging indents | 1 |
| Create table | 2 |
| Resize table dimensions | 2 |
| Reset font size for headings in the table | 1 |
| Total | 10 |
See below (at the bottom of this page) several YouTube links for Word tutorials. And a tutorial by us (Mike Strong, Nicole English) about style across the ages, then as applied in magazines, then web pages and as styles and themes in MS Word.
Here is an image of the final product for you to create using Word.
Hints and a partial tutorial follow this illustration.
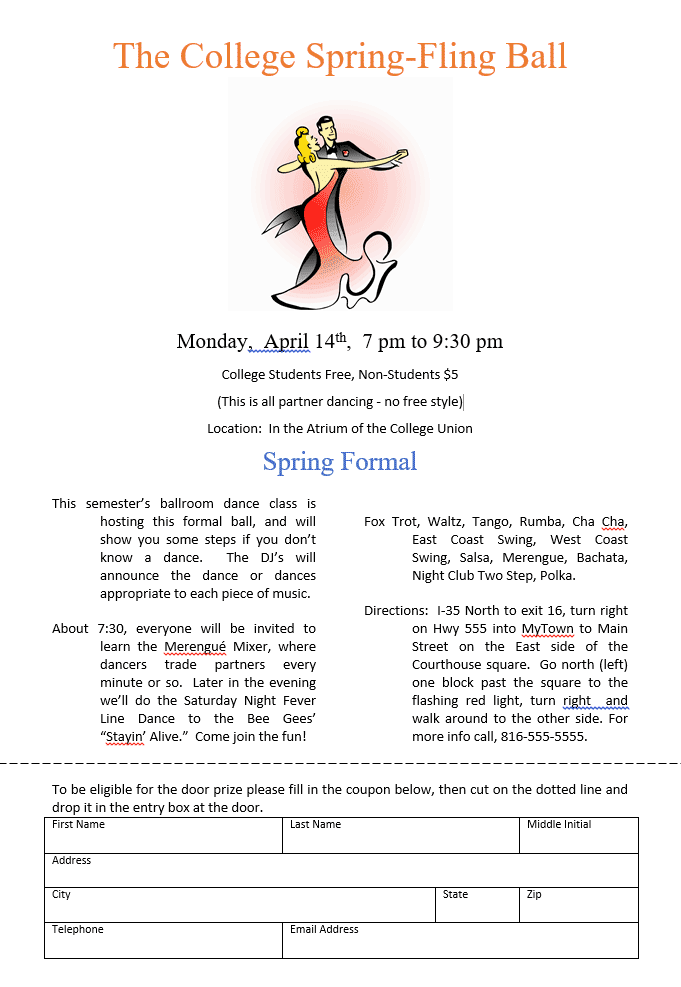
This example has a number of other items not shown in the brief tutorial below. Your job is to figure out how to do the shape drawing and text box on the bottom and to come up with your own image and decide how you wish to format the top text. It should look fairly close to what you see here. Be careful to retain the alignment (centering on top).
What you will learn about
- Setting columns in a document
- Creating hanging indents for paragraphs
- Inserting and sizing pictures
- Draw with shapes
- Create tables, add text, merge cells and resize it
- Apply various text formatting options you learned about in "styles" above
What you are expected 1) to do and 2) what to turn in
The picture above is your example to follow. It is a screen captures of actual text.
1 - open Microsoft Word
2 - start a new blank document
3 - type in the text as shown below
4 - use the partial tutorial below to help you format the document's appearance
5 - When done turn this in (email the file)
Partial Tutorial and Hints for the Invitation Flyer (illustrated above)
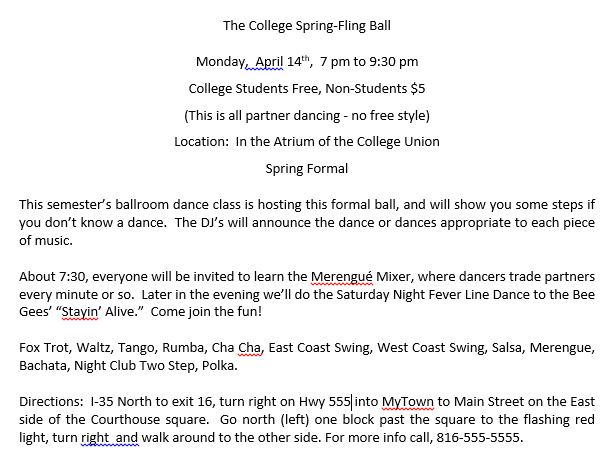
This is the start in plain text. Type this into your new Word document.
Set up the two columns
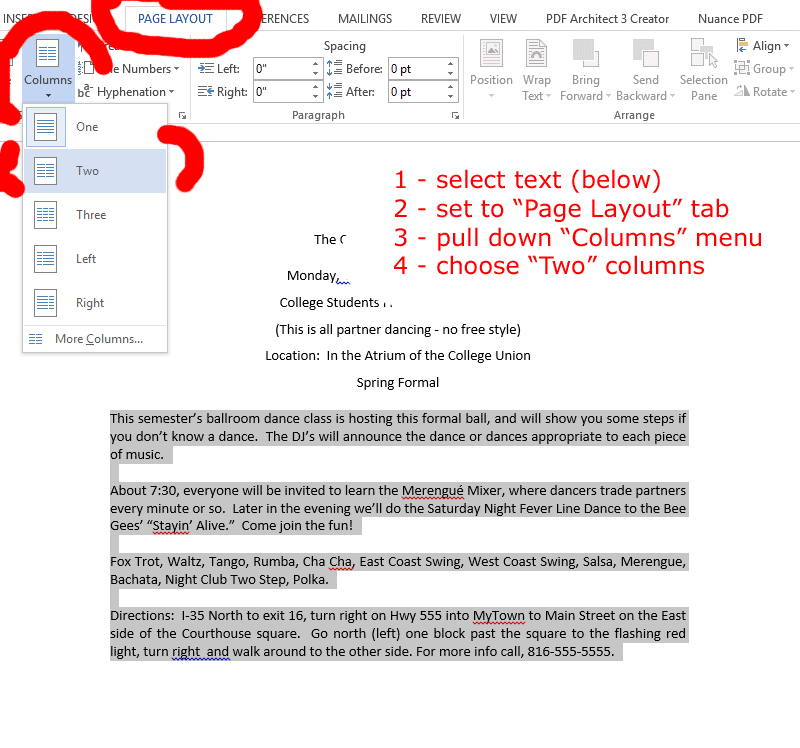
1 - Select the text you want in your two columns.
2 - Click on the "PAGE LAYOUT" tab on the top ribbon
3 - Click on the down arrowhead to pull down the column options
4 - Click on the "Two" column option
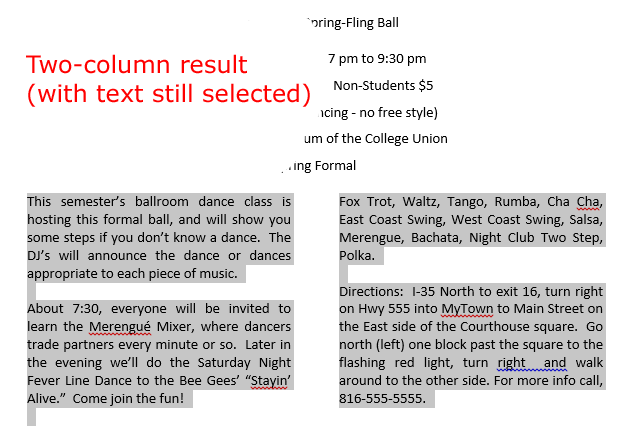
Here is the result. The text is shown still highlighted.
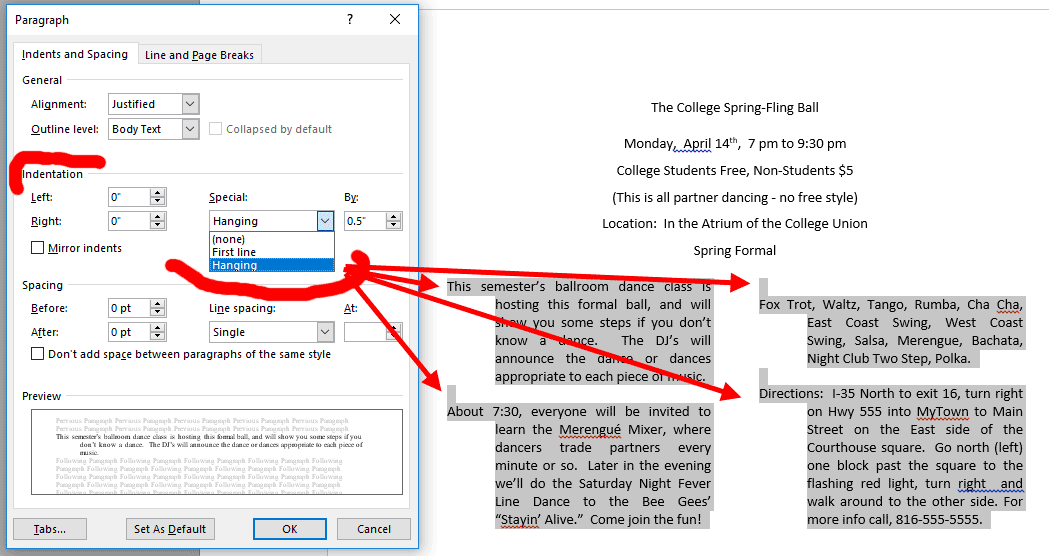
Keeping these four paragraphs highlighted, right click to get the paragraph dialog and select "Hanging" in the "Indentation" section.
An Image Insertion
From the insert tab at the top, choose image from the internet (unless you have one of your own in a file you want). Search for "dancers" or "dance" or any other term which gets you an image showing a couple at a dance. Click on it to insert. Choose to have text flow around the image.
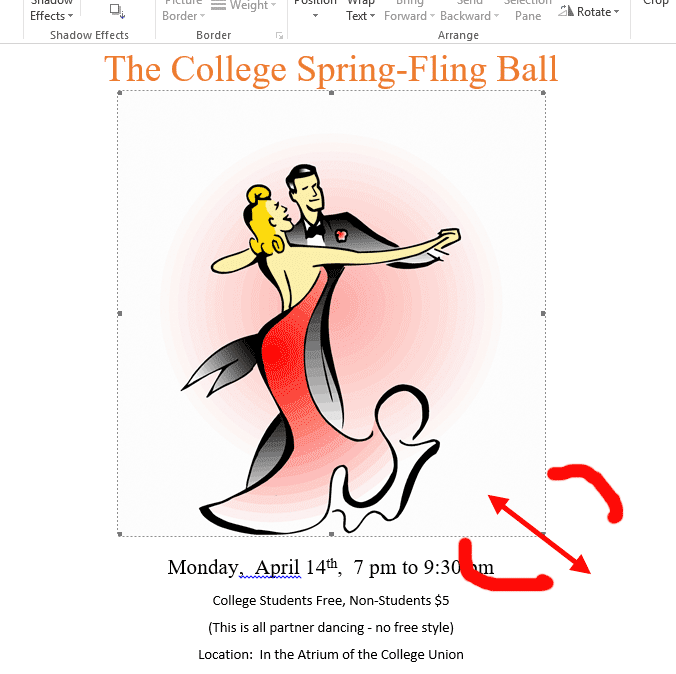
Use the "handles"
at each corner to re-size the image. Then position it where you want.
Making the Door Prize Coupon at the bottom - Using a Table
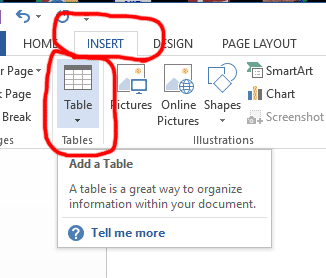
First click on the "INSERT" tab at the top, then click on the Table button on the ribbon. That gets you the selection box below.

The checker-board array of boxes in rows and columns is a graphical way of setting the number of rows and the number of columns (as opposed to typing your selection). As you moved your cursor across the array you will see the table form in each configuration in the document below.
For this table, to make our coupon, we want to make a table with 4 rows and 5 columns.
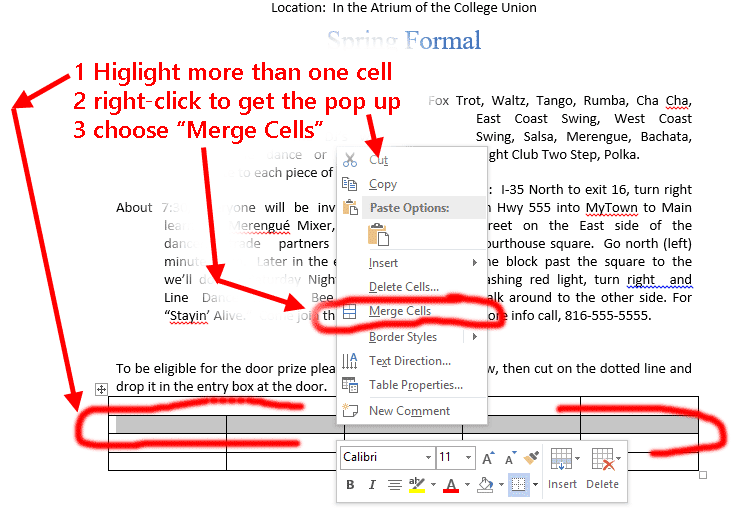
You will need to merge some of these cells to get the final arrangement. Highlight the cells you want to merge by dragging your cursor across them, then right click to get the popup menu and pick the "Merger Cells" option.
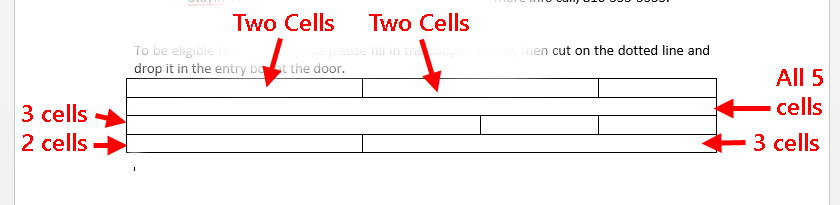
When done you should have a table which looks like the illustration above. I've annotated the image to show you which cells were merged and how many were merged in each location.
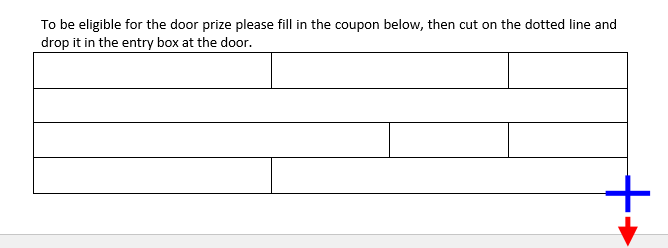
After this grab the lower right handle and pull down (drag down with the cursor) to increase the height of the space in which people will write their names.
Heading text for the boxes in the table
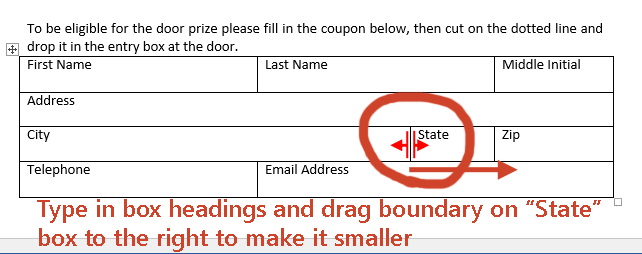
Next type in the cell headings just like this. By default they will be in the upper left of each cell box. The "State" cell doesn't have to be as large. Stage abbreviations are only two characters, though other countries may have longer province abbreviations. In any case, to narrow the State box, position your cursor over the left side until your cursor looks like the redrawn version above with left-right arrows, then drag it to the right until it looks right.
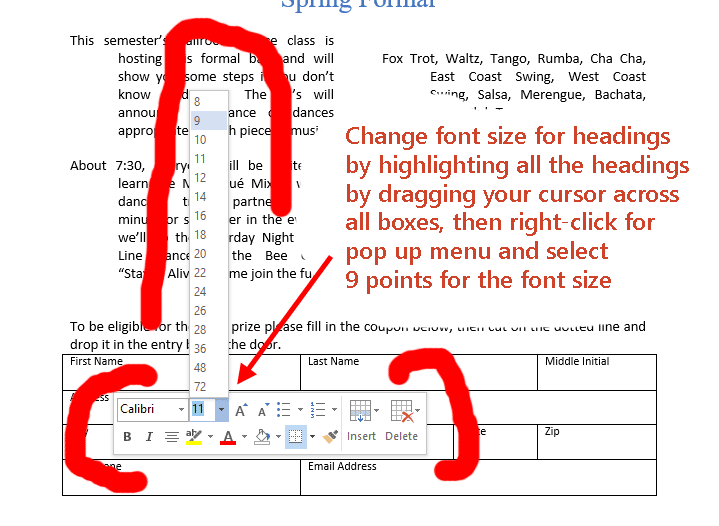
One last adjustment in the table, change the font size in the cell headings to 9 points from its current 11 points. We want smaller text in the headings to leave more room for people to write in their information.
To do this drag your cursor across all the boxes, highlighting all the text at once. Then right click to get the popup and use the pull-down list (in this case it goes upward, not down) to pick a smaller (9 point) font size.
Drawing a Shape for the Cut Line
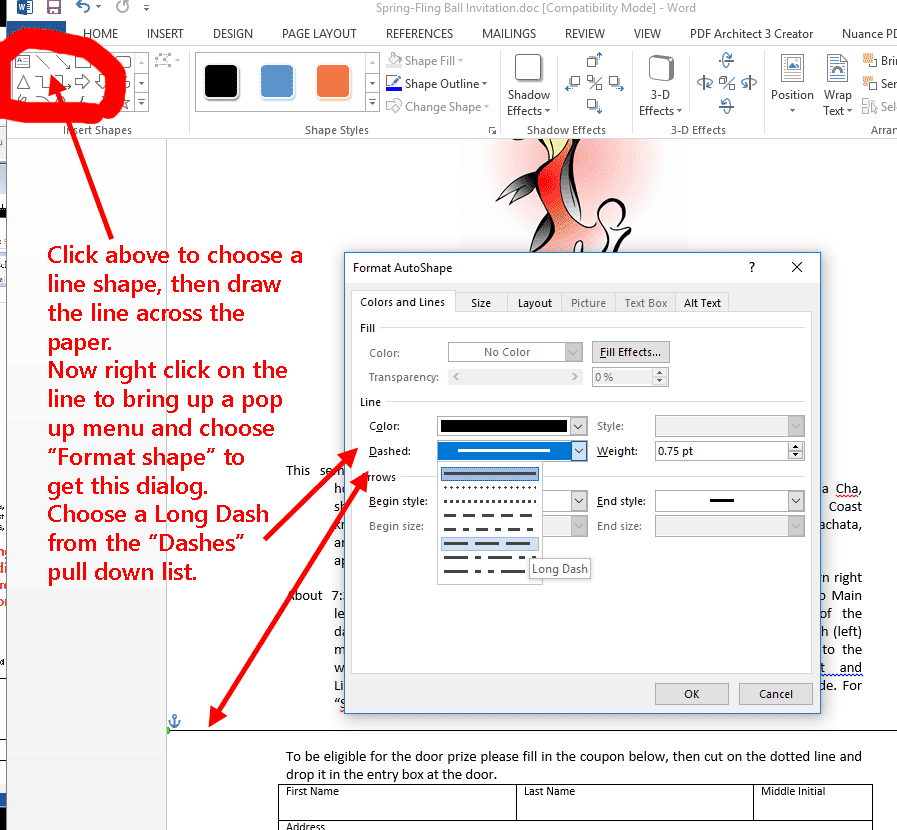
The final item is a shape to get our dashed line across the document which forms the cut line.
In the upper left in the ribbon click on Shapes and pick the simple line (also in the upper left of that panel). Bring your cursor down to the cut-line location on the left, click and hold on the mouse then drag your line shape across to the right. Be VERY careful to get a straight-across line (not slanted).
Now that you have the line, because the default is a solid line, you need to format it into dashes. Right click on the new line to get a popup menu and choose "Format Shape" option. This gives you the "Format AutoShape" dialog.
In the "Colors and Lines" tab (the default tab) go to the "Lines" section in the middle and click on the "Dashed" pull-down list menu. Pick the "Long Dash" option. Whlle you are there look around a bit just to see all the possible shape modification options. You can use this to modify any of your shapes, whether a line like this one or a figure with more volume.
Part 2 (EXTRA CREDIT)- Working on individual style elements
| CIT105P Rubrics | |
| Assignment 2b: Word Processing, Styles | |
| Assign title style to main heading | 1 |
| Assign heading1 style to headings for each section | 1 |
| Assign sub-title to URLs | 1 |
| Create your own "indent" style for regular paragraphs | 5 |
| Apply your new style to the paragraphs | 1 |
| Submit original doc with one stylesheet variation | 1 |
| Total | 10 |
Styles, or style sheets as they are called for digital media, are used to:
1 -
give a consistent "look" to a document, a series of documents, a web site, a magazine or other publications. They are
2 - easily and quickly set up formatting across a document (when that document is created using headings and paragraph types)
Styles are used across word processing documents, web pages and publishing. Before we get to your Word assignment and how to use styles in Microsoft Word, we will take a brief detour to see how the same thinking works for web pages by using this page as an example.
What you will learn about
You will learn about
1 - style elements
2 - style sheets
3 - themesWhat you are expected 1) to do and 2) what to turn in
The pictures below are your examples. They are screen captures of actual text. The text itselt is available as a starter for you within the area with the "lightgreen" background.
1 - open Microsoft Word
2 - start a new blank document
3 - type in or copy and paste the text as given, or if you have a similar document you would like to use with a major title at top and with sub sections with their own headings, sub headings and paragraphs under, then use that. But, if different, it must contain all the major items or you might not get full points.
4 - apply style elements to text selections, as illustrated in the starting example
a - this is the first part of the style assignment, turn it in
5 - try various style sheets as shown at the right under the "Home" tab
a - pick one of your variations and turn it in. This is the second part of your style assignment.
6 - If you have Word 2010 or later or Office 365, try out various themes, under the "Design" tab
a - Extra Credit in the style assignment. Turn this in. It is not required but is extra credit for you if you do.
How stylesheets are used in a web page, such as this one.
For example a stylesheet was used to give a look to this web page. When creating the page various pieces of text were designated as HTML elements, such as H1, H2, H3, H4, P (for heading 1, heading 2, heading 3, heading 4, and paragraph). The elements are designated within tags, left and right angle brackets. The CS105P at the very top is an <h1> element. The "Word Processing Assignment 1 - Styles" is an <h2> element. The "Part 1 - Working on individual style elements" is an <h4> element. "How stylesheets are ....." is an <h5> element. This paragraph is a <p> (for paragraph) element.
Once the elements are assigned to the text items, the way each of those elements looks can be controlled by a stylesheet. Changing out a stylesheet changes the entire look of the web page. Before stylesheets, each element in the document had to be separately formatted and to change the look of an entire page required finding each and every element in the web page to individually change the look of that text.
A few style examples. Here were are using the style sheet used with this web page. It uses Arial or the current sans-serif font on your system.
(A "sans-serif" font is one without the extra decorations at the ends of the lines, the side walls, which make up each character of a font.)
h1 (heading 1)
h2 (heading 2)
h3 (heading 3)
h4 (heading 4)
h5 (heading 5)
h6 (heading 6)
p (paragraph)
Each element's style settings control a variety of appearance items, such as size, font face, color, position, alignment and so forth. The lowest numbered heading is the largest in point or pixel size and each successivly higher number is a slightly smaller font size. (Just look above. It is easier to see above than to read in this description.)
Using these settings you can also mirror the organization of your document, starting with the most important items as larger. You can also use these element tags to show the organization in terms of chapters and sections.
If you wish to change the look (font face, sizes, colors, etcetera) at any time you can switch out the style sheet and have a very different looking document without having to change any of the text.
Here is another view of the example ahead. This time we are using Times-Roman or any serif'd font as a modification from the other style. "Serifs" are the little decorations at the ends of the letter sides.
We've also changed the h1 color to yellow and added a black shadow to the text with a 4-pixel offset and a 3-pixel blur radius. Your browser may or may not be able to see the text shadow. For this example the <h1> heading line was changed using the "inline style" method. Inilne styles are styles written into specific elements when the style sheet is not set up to handle some specific exception to the rest of the document.
Here is that HTML tag with an inline style: <h1 Style="font-family:'Times New Roman', Times, serif; color:yellow; text-shadow: 4px 4px 3px #000000;">
Normally, with styles coming from the style sheet you would see the font-family and other settings only once, in the style sheet. In the document itself you will never see the styles. You would see only the <h1> or <h2> or <p> or other tag by itself. The browser would then supply the formatting for that tag as defined in the style sheet.
h1 (heading 1)
h2 (heading 2)
h3 (heading 3)
h4 (heading 4)
h5 (heading 5)
h6 (heading 6)
p (paragraph)
How style books are used in Newspapers
Setting a standard look for documents and publications goes back centuries. Actually millenia if we include standards for organizing written information from pictographs to alphabets and even statues and wall paintings.
Most publications have their own "style book" which
1 - provides a standard look to their publication
2 - makes it easier to work quickly each day without having to invent a look for every article and for each edition
Here is a quick look at a number of newspaper front pages. Notice how the largest text items are at the top and become smaller down the page and sometimes from left to right. Notice how the width of columns sometimes changes depending on how far from the top they are.

_front_page.jpg)
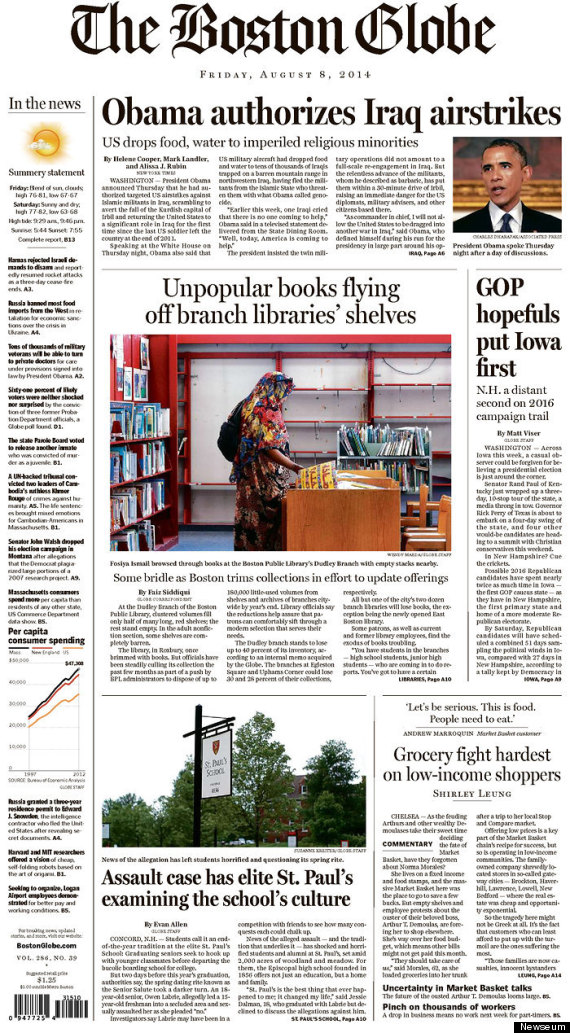
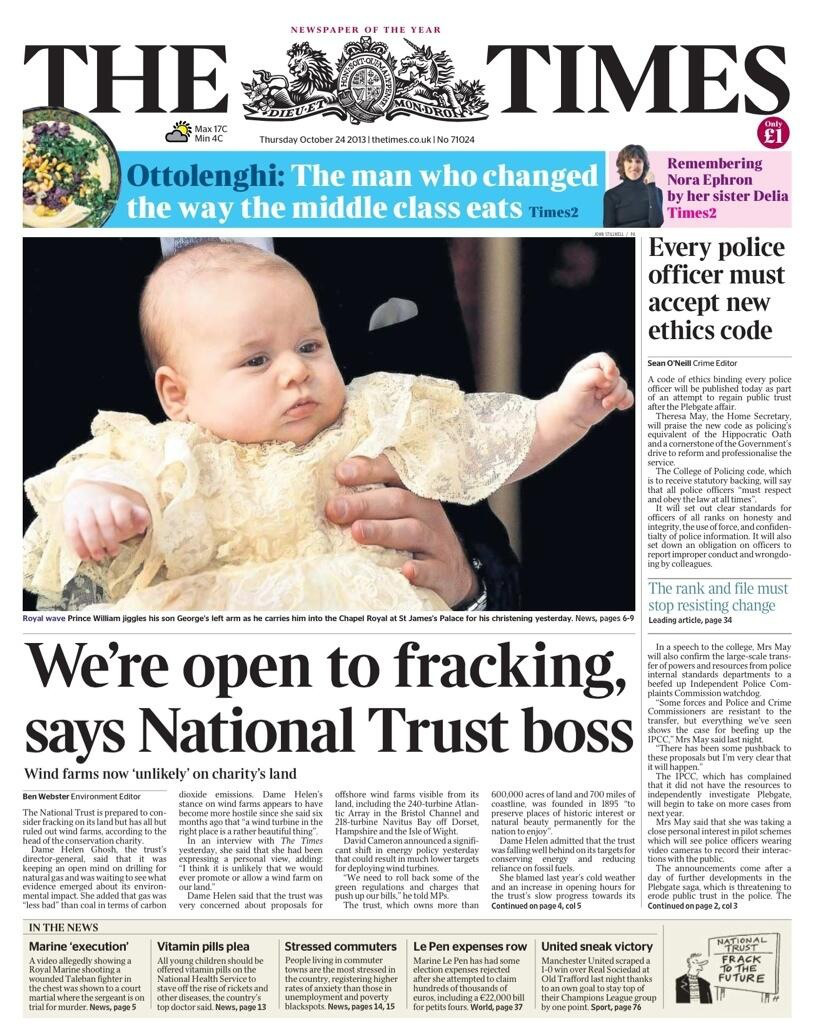
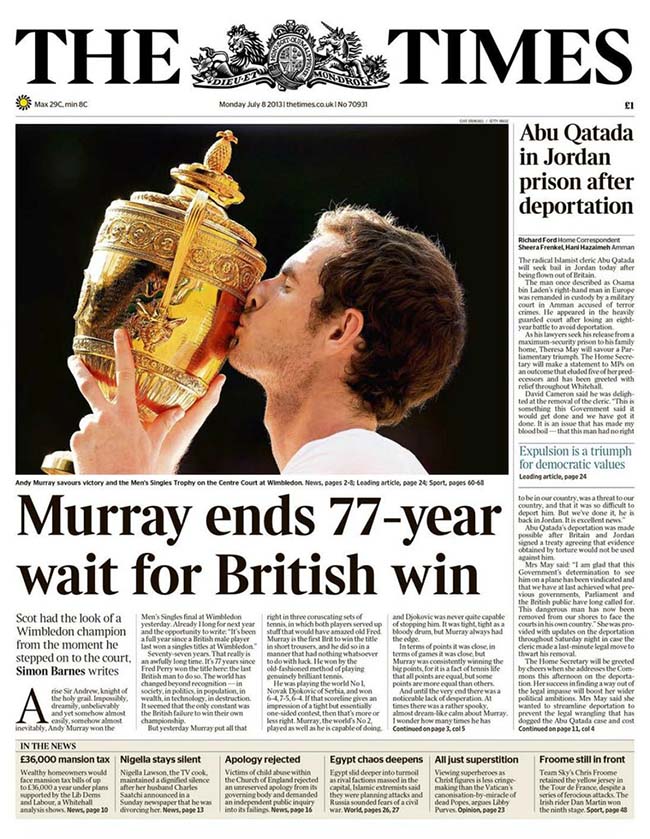
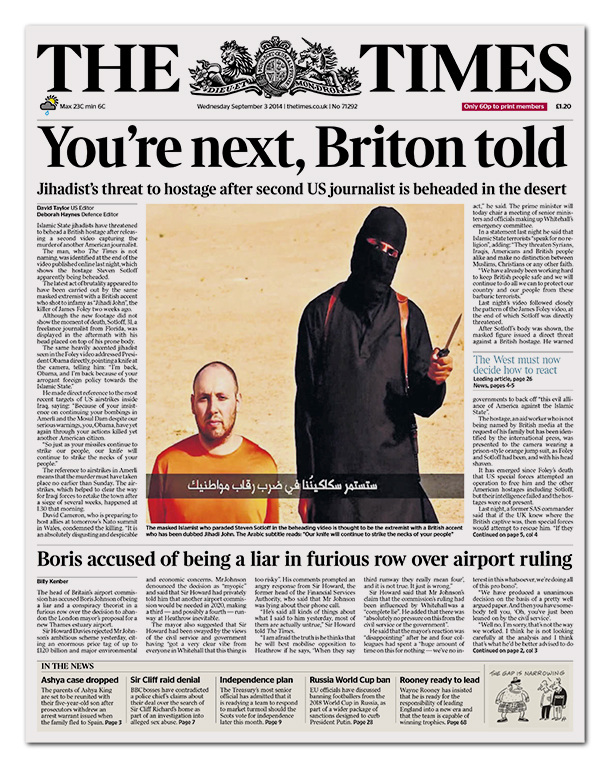
By the way, the top line of huge text with the newspaper's name is called The Flag.
How styles are used in Microsoft Word
For our example page we are going to use a short list of ballrooms hosting a New Year's Eve dance (an actual list from 2015 with the year left off for the example). This wasn't our full list back then but it has three sections, each for a ballroom. That way we can show how we organize our information display on the page. There a general overall heading for the page and each ballroom can have its own smaller heading.
First, the basic text. You can copy this text to your starting Word document. Then assign headings and re-arrange the remaing text to look better.
New Year's Eve Dances
December 31st
Walters Dance Center
http://www.waltersdancecenter.com
8pm - 2am
$20/person in advance $25/person at the door
Address: 5023 Minnesota Avenue, Kansas City, Kansas, 66102
(913) 287-3355
Camelot Ballroom
http://www.camelot-ballroom.com
New Year's Eve Gala-Dinner & Dance to the Heart Strings Trio
7:30 pm� to midnight
$120/couple:� Includes Dinner & Dance, Party Favors, Floor Shows, Midnight Champagne Toast, Coffee, Tea & Soft Drinks
Address: 6635 West 151st Street, Overland Park, KS 66223
Phone:� (913) 897-4622
TEAH Ballroom Dance Studio
http://www.TEAHballroom.com
$55 per, $100 couple
7:30 Cocktails, Catered Dinner, Dance until 12:30 am, Champagne Toast at Midnight
Semi-formal or formal attire
9050 Metcalf Avenue Overland Park, KS 66212
(913) 642-7410
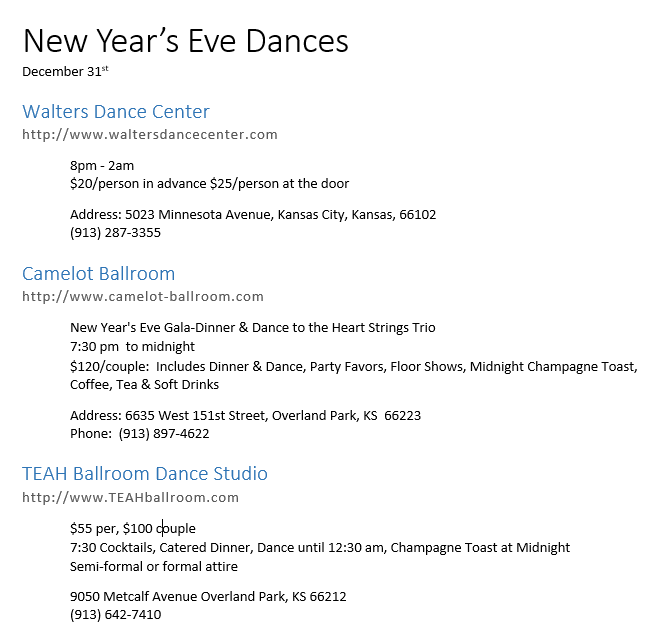
Below is an image of this "bare text" (a screen capture from Word).
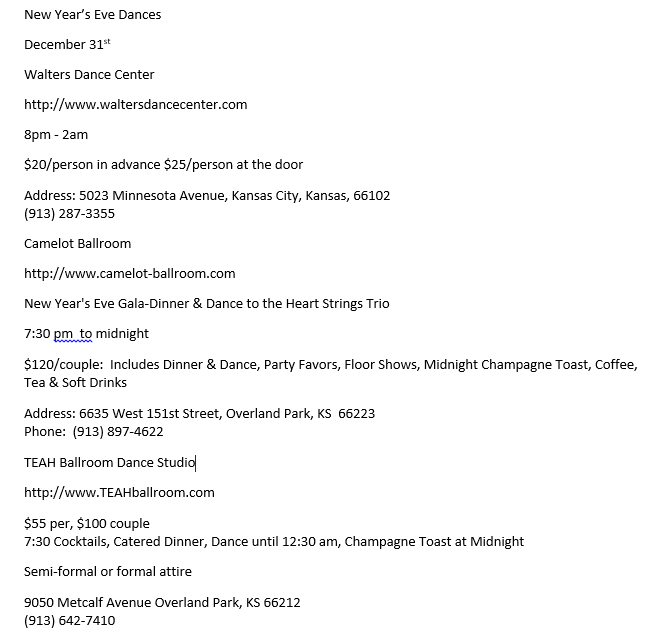
NOW, highlight the first line of text and click on the "Style" along the top right labeled "Title."
NOTE: the ribbon tab at the top is on "Home" which will show the style sheets along the right. Also note that you will see style sheets listed along the top of the "Design" tab. But using the "Home" tab for most work give you a wider array of formatting choices in one spot.
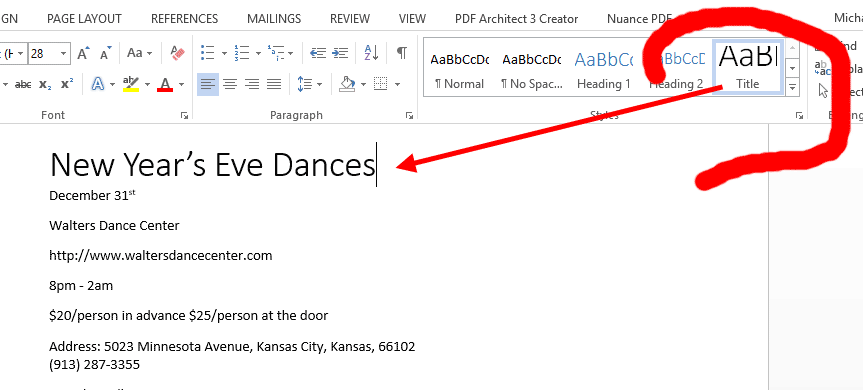
Time now to highlight the name of the first ballroom and choose the "Heading 1" style.
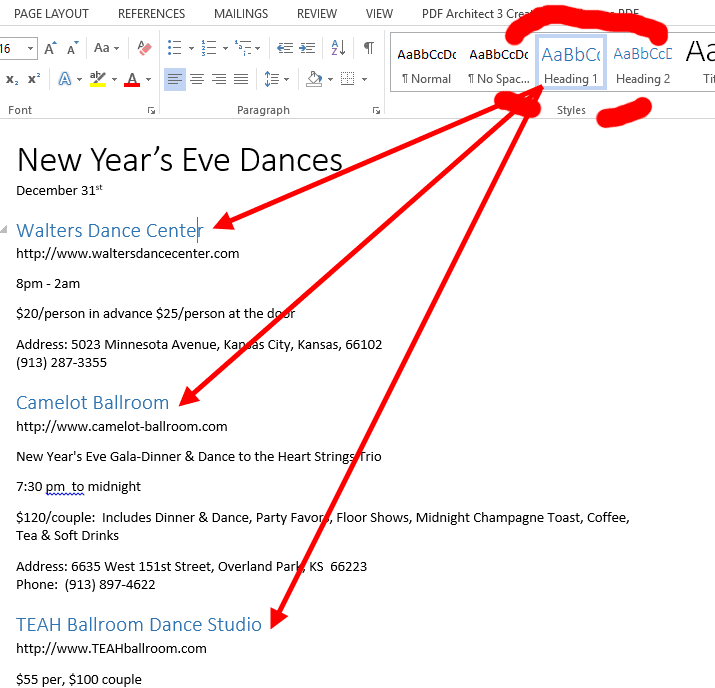
Above we assign the "Subtitle" style to the internet addresses (URLs)
Below we add a little arranging to the text locations and we've applied an indent. Again, highlight the area you want to change then click the effect.
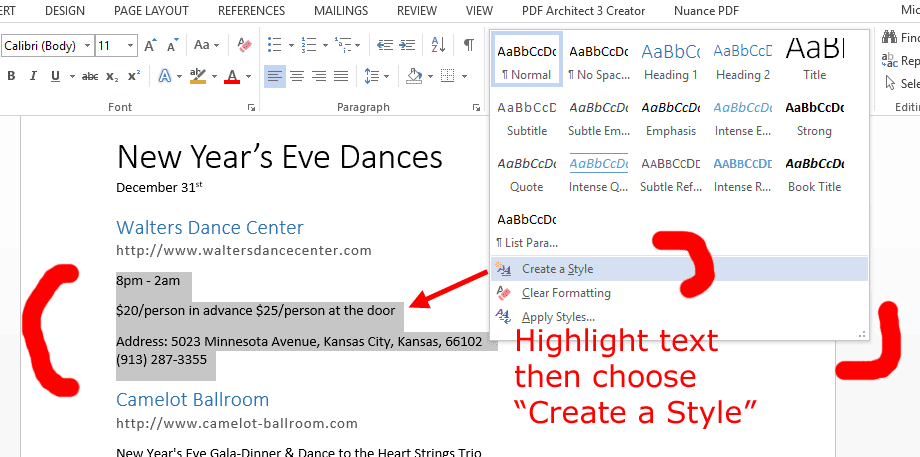
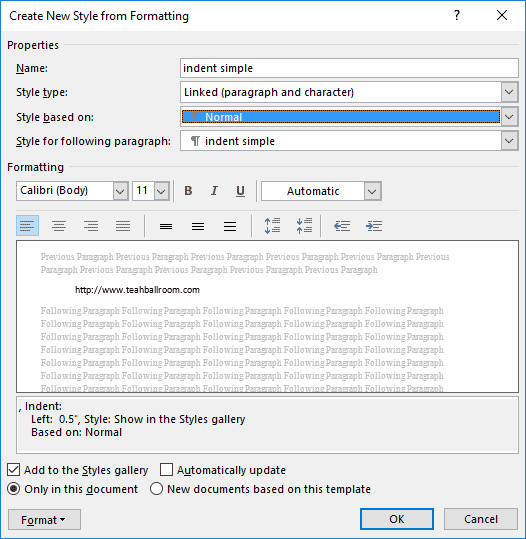
Now we are going to create one of our own styles. In this case I want a regular paragraph with a slight indent built in rather than having to click the indent each time.
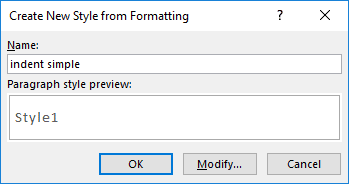
The "Modify" button gets you the dialog below. Here I've clicked on the indent and change the font to one based on "normal" text.
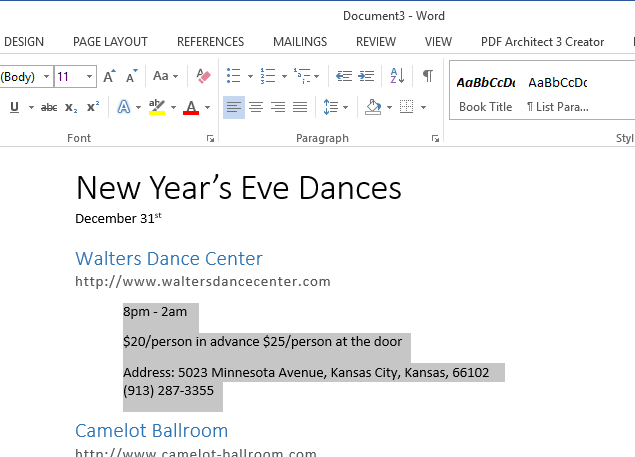
The newly created paragraph style, still highlighted. The click your newly created style. (see next image)
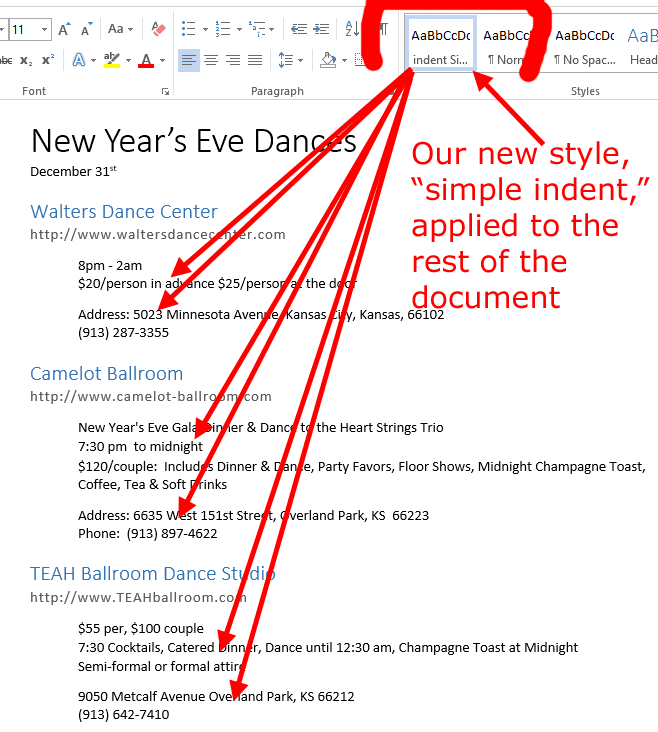
To set a paragraph to a style, position your cursor on the paragraph you want to assign a style to and click on your newly created "Indent Simple" style button. Do this for each paragraph in the body text for each listing.
Or, if you want to apply this style to more than one paragraph, simply highlight (as in the previous image) all the paragraphs you want this to apply to and click on your newly created style.
The variations are prettly limitless and when you want a specific appearance spread across a long document or documents this is an especially fast and easy way to keep everything looking the same without having to format each word or paragraph at a time.
Assignment Alert #1
Starting Example - 1st part of the style assigment
Below is an image of your Style Example to duplicate. Look at the steps above. Note that we are using several style elements, Title, Heading 1, subtitle (used here for internet URLs), and the indent style we created above which we called "indent simple." When you have this example
Part 2 - The Style Gallery - change the style sheet for overall appearance change
So far we've worked with style elements within a style sheet. This shows how applying styles to text can give a consistent look to a document.
NOW, we want to show the kind of power changing from one style sheet to another gives you. The elements are defined differently in each style sheet.
So, let's apply a different style sheet using the Style Gallery. Note that we have not changed any text and we've already designated which text has which style element.
Below, the "Style Gallery" is found on the "Design" tab in Word. It can be pulled down to select a style sheet or scrolled. Either way, any selection will change the appearance of the entire document immediately. Each has a name given it by someone at Microsoft, such as Numbers, Fancy, Thatched, which you will see below in the example headings.
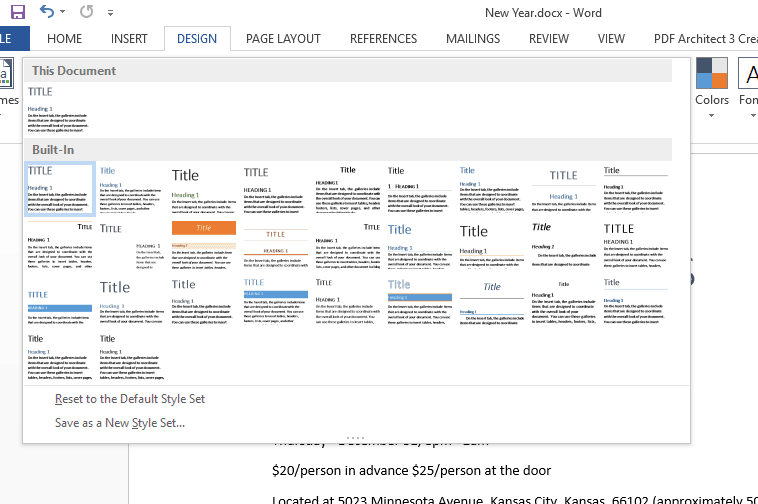
Above we show the style gallery pulled down to see the full selection. Note that the style gallery is usually folded along the top ribbon so that you see only one row at a time. You don't normally want all style open anyway. It covers too much screen real estate. Along the right edge of the folded gallery (not shown)
are three control buttons. From top to bottom they are 1) scroll up, 2) scroll down and 3) pull down to view all selections as shown above.
Assignment Alert #2
Three Examples - use one of your own selections as the 2cnd part of the style assignment
Here are three examples of applying style sheets by making various selections from the style gallery. Notice that we never change the text, only the style sheet. Because we've already declared certain text items to be various types of style elements (such as title, heading 1, heading 2, subtitle, etcetera) each of those elements takes on the appearances set up in the newly selected style sheet.
Example 1 - "Numbered"
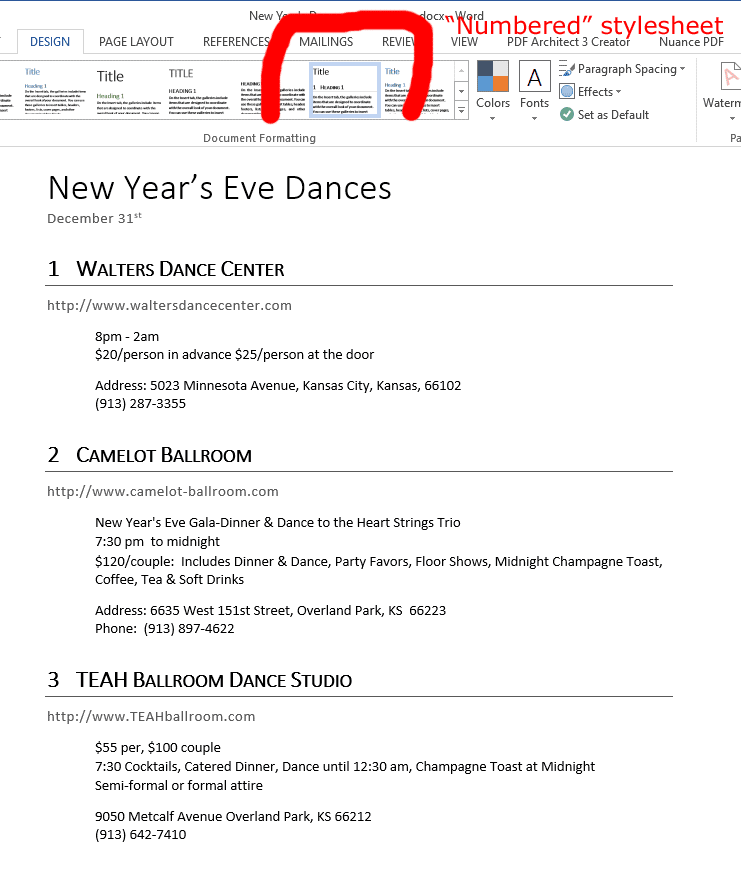
This is the same document as above with the style labeled "Numbered" selected, as shown by the surrounding marker at the top.
Example 2 - "Fancy"
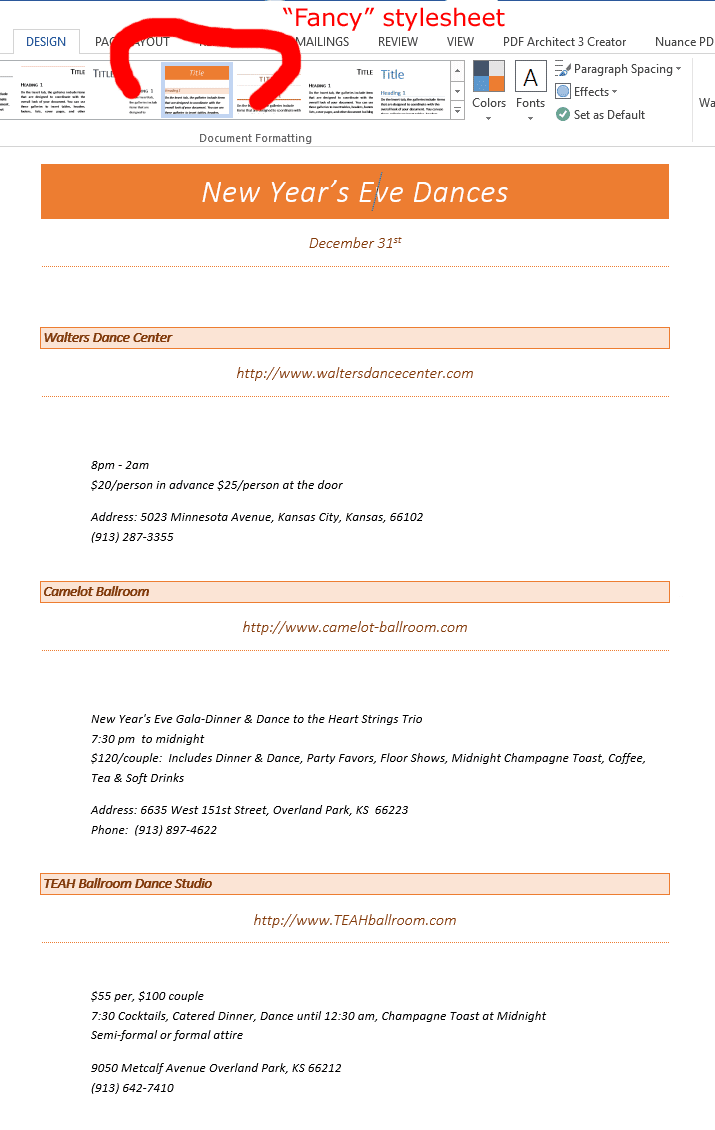
This is the same document as above with the style labeled "Fancy" selected, as shown by the surrounding marker at the top.
Example 3 - "Thatch"
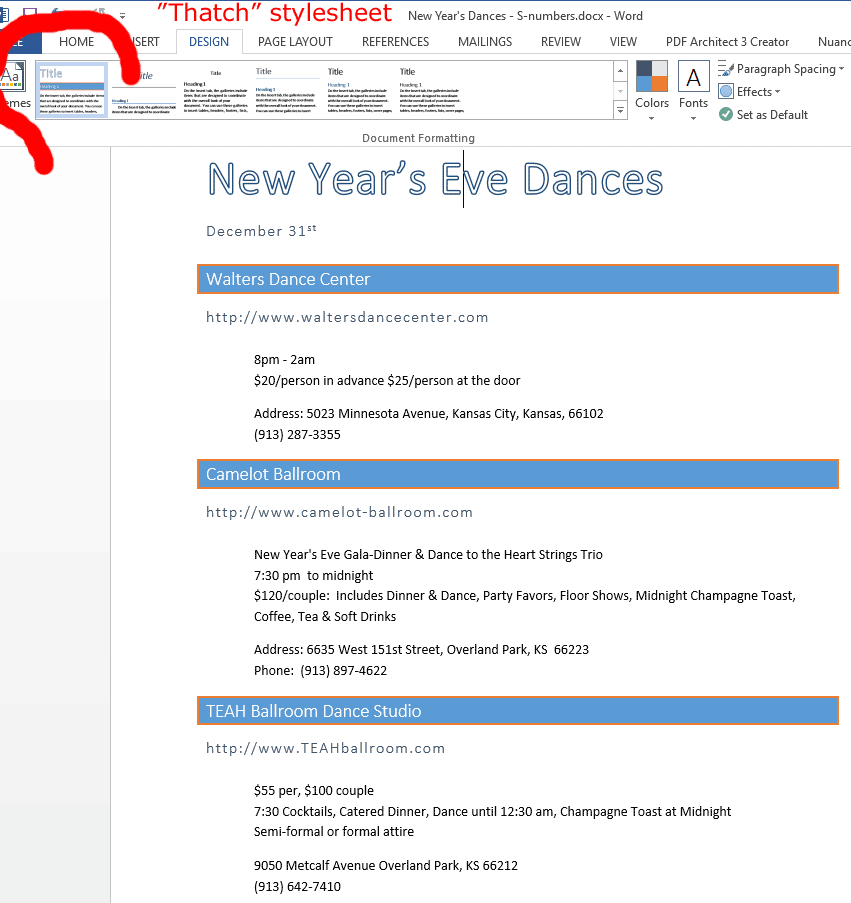
This is the same document as above with the style labeled "Thatch" selected, as shown by the surrounding marker at the top.
Part 3 - Theme Gallery - Wood Type theme (goes with style sheet variations for points)
In practice there is no readily visible difference between themes and stylesheets. Both have been around for a long time and both share characteristics. Styles, stylesheets and style books have been part of printing for centuries. It is hard to know when the concept of themes began to duplicate the functionality of stylesheets. Now, we have both on the Word menu and for most intents and purposes they essentially duplicate functions. I suspect a couple of factions in the software teams at Microsoft, each pushing their method for overall document appearance change. On the user end there is no clear difference.
So, themes are at the top of the set of overall-look control devices with styles playing an included role within themes. This is for Office 2007 and above. Earlier versions of Office do not have themes. You cannot save documents with themes as earlier versions (1997-2003) of Word Docs. That makes themes a bit less universal. It may make them non-shareable with Google docs, Open Office or Office Libre.
Those points noted, if you are using Office 2010 - 2013 and above or Office 365, you will have Themes available to you and can get extra points by submitting your document with a theme. I have a suspicion, having been in enough such software-design meetings (no inside knowlege on this issue, just a guess), is that when Office 2010 came out there were enough incompatibilities with earlier Office that instead of simply adding to the existing styles someone made the decision that Themes would be a separate category, making it easier to deal with in terms of saving back to an older format. When saved to an older format any themes would not be saved in the document. The alternate method would have been to add any such capabilities to styles but saving only some of any style when saving to an earlier version of a Word file. This isolates a programming problem related to upgrading software. Making a clear distinction is a bit confusing in usage and outer appearance.
I have another speculation and that has to do with the use of the theme concept for the overall appearance of desktop-publishing documents and on web sites and for the desktop screens of computers. This was usually separate from stylesheets which were used primarily for text formatting. Along the way the two overlapped each other in function. So now we have these two terms for essentially the same purpose. It is a bit frustrating and if I were answering a quiz on which is which I'm not sure I would know how to answer in any way which would clearly distinguish one from the other for a regular user.
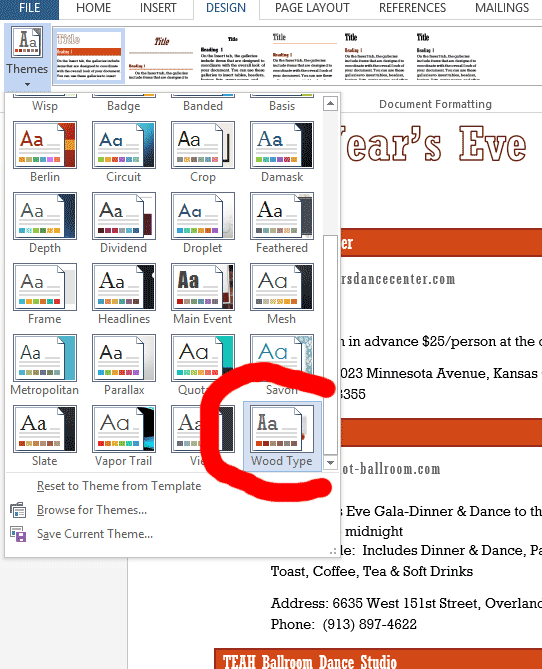
In the screen capture above we show the "Wood Type" theme being selected from the Theme Gallery pulled down to see the options.

Here is the document with the "Wood Type" theme applied. As you can see, the effect, changing the overall appearance of the doc, is the same as applying a stylesheet.
The "Power" of Stylesheets/Themes
Either is extremely powerful in that you can make a lot of changes at once. Before stylesheets you would have to change each single item of text in an entire document, one by one. Very laborious. But by applying styles to the elements of your document you are setting it up so that changing the stylesheet or the theme will change to overall appearance while retaining all the relationships (setting a title, a larger heading, a next larger heading, regular paragraph text, special paragraphs and so forth).
Online Helpers
Video Orientation
This video (by Mike Strong and Nicole English) starts with the concept of "A Look" through history. Then it moves to style sheets in web pages and then an example of using Microsoft Word to control the look of elements on a page and of the entire page.
Remember, each item on a page can have its look changed in at least three major ways
1 - Selecting and setting font face, size, attributes
2 - Selecting and setting a tag (such as "heading 1" or "title") for the text along with an appearance
3 - Picking a "Theme" which bases its assignment of fonts, colors, etcetera on the "tag" names you gave text when you set tags
For a larger resolution (1280x720) go to Vimeo at https://vimeo.com/232078049 for Style in Time.
A few YouTube links for Microsoft Word (a starter list only)
Just Google for "Microsoft Word tutorial"
Microsoft Word 2016 - Full Tutorial for Beginners [+General Overview]* - 13 MINS!
https://www.youtube.com/watch?v=2bQSJPQhafg
Introduction to Microsoft Word 2016 - Getting Started Tutorial for Beginners
https://www.youtube.com/watch?v=eDEVNcSArlc
Word Basics - Tutorial for Beginners - Microsoft Word 2010, 2013, 2016 Office 365, Getting Started
https://www.youtube.com/watch?v=prpVvtHB24M