Create a Web Page Template
To make it easier and faster to turn out more pages
In order to maintain a consistent look throught a site, both for the general appearance and for easier maintenance we need to construct a template page (at least one).
- Our Page has several parts
- A heading
- A navigation bar (menu)
- An area for the body text and overall page information
- A copy of the navigation bar at the bottom
- A copyright notice at the very bottom
- Name the File "template.htm"
Remember - there is nothing special about this file. It is just another web page, but without any content. It is a blank page. The usage we put your template page to is the key to rapid web site creation by spawning the other pages from this one.
Once you have the template file on your system you can quickly create all the other files in rough form with your text editor by from the File menu with the File-Save-As option. Just keep doing File-Save-As for each file name. Then go back and change the Title Tag information in the header for each file and change each heading text at the top
When you finish the "Save As ..." operations, you will have a site with several blank pages you can navigate. All you have to do is to fill in the pages.
Creating the Template Page From Scratch
Step-by-Step
1 - Files We Will Make From the Template
| Description | - | Filename |
| A Home page | - | Default.htm |
| A bio page | - | Bio.htm |
| Blog page (for articles) | - | Articles.htm |
| Picture Page | - | Pictures.htm |
| Page for our favorite Links | - | Links.htm |
| Contact page | - | Contact.htm |
| Blank for a space holder | - | Blank.htm |
Start a new text file in Notepad (or any other favorite text editor). Save it as "Template.htm"
TAGS: Almost all HTML tags have a start tag and an end tag. Tags are always enclosed within right-angle brackets (or less-than and greater-than symbols) - < and >. They are basically the same except that end tags have a slash character just in front of the tag name. The starting tag tells the computer when to begin something and the ending tag says when to stop.
Start tags look like this: <tagname>
End tags look like this: </tagname>
Notice the "/" just after the "<" and just before the tag name.Attributes: Start Tags can also carry modifiers called "attributes" which change the nature or the behaviour or the look of the tag contents.
Attributes always have the form: attributeName="attributeValue"
Examples of Attributes in tags:
1
<a></a> - "anchor" tag pair
Making links: with the "href" attribute (href stands for Hypertext REFerence)
<a href="http://www.google.com">Google</a>Looks like: Google
2
<p></p> - "paragraph" tag pair
Centering the paragraph with the "align" attribute
<p align="center">This paragraph will be centered.</p>This paragraph will be centered.
3
<b></b> - boldface tag pair
This is a statement changing to <b>boldface text and </b>back to regular textLooks like:
This is a statement changing to boldface text and back to regular text
As a practice, when creating tag pairs in HTML, create both the start and the end version of the tag before you type in the text between the tags. Otherwise it is too easy to loose track of which tag goes with what text, leaving the HTML structure open or inconsistent.
2 - The HTML Page Structure
A "Legal" HTML Page
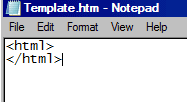
To create an HTML page all we need is a single "HTML" tag set.
Enter these two lines of code
<html>
</html>Save this. You now have a fully legal page. It has nothing in it but it is a legit HTML page.
Heading
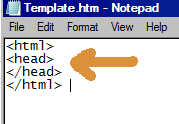
Add these lines of code to create an area for "metadata" at the top of the HTML page. This area is never visible but it includes various types of information for search engines as well as
<html>
<head>
</head>
</html>Save This file as Template.htm
Body Text Area
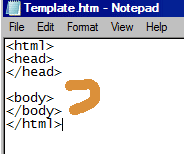
Now add the visibile area of your HTML page. Everything which is visible on a web page is placed within the <body></body> tags.
<html>
<head>
</head>
<body>
</body>
</html>
At this point you have a full HTML page with the two main content areas but so far no content. So it will still appear as a blank page.
3 - The Head Section of the Template
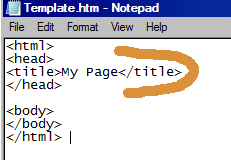
1 - The Title
The title is used in a couple of ways
a - Anything here shows in the title bar at the top of the browser window
b - The title text is saved on the menu when you save bookmarks (favorites)
c - Shows up prominently in listings by search engines
<html>
<head>
<title>My Page</title>
</head>
<body>
</body>
</html>
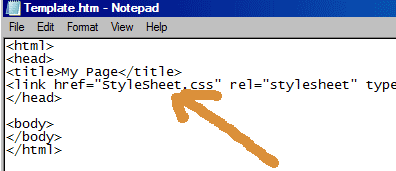
2 - Adding a Style Sheet with the <link> tag
Style Sheets are a way of controlling the way HTML tags format text in the document without having to use specific formatting tags throughout the entire document.
<html>
<head>
<title>My Page</title>
<link href="StyleSheet.css" rel="stylesheet" type="text/css">
</head>
<body>
</body>
</html>
4 - The Body Section of the Template
1 - A Single Link to a single page
Any link to any of your pages will look like this example to the Bio page
<a href="Bio.htm">Bio</a>
2 - Making a Set of Links to Navigate Your Site
When we know what the names and purposes of the principle pages on your site you can group them together into a "navigation" section. You can put these links anywhere on your page or pages but it makes navigating your site easier when you place them in one location, creating a "navigation bar."
When you put together all the links for all the pages into a single package, they look like this. We've added a vertical bar "|" (also called a pipe), as a separator between the navigation link items.
Note that these links are on separate lines. This is for human eyes. The computer doesn't care. It makes them easier to see and easier to manage. In the browser they display in a single line with the vertical bars between each of the items.
<a href="Default.htm">Home</a> |
<a href="bio.htm">Bio</a> |
<a href="Articles.htm">Blog</a> |
<a href="Pictures.htm">Pictures</a> |
<a href="links.htm">Links</a> |
<a href="contact.htm">Contact</a>Together, in a package like this, they can be used in several places with a simple copy and past into the top nav bar, the bottom nav text and even in the nav links file. For that see the two sections below.
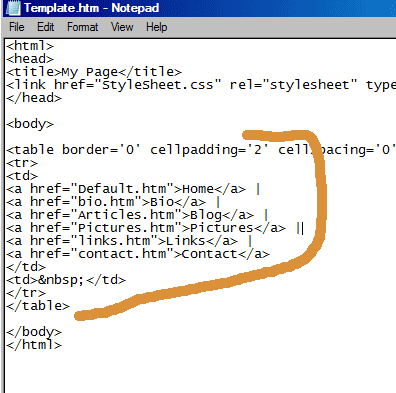
Links (from above) in a Top Navigation Bar
For the top navigation bar we create a table with a width of 95-percent of whatever the browser window is at any time. Then we put the navigation links (from above) within one of the table cells
<table border='0' cellpadding='2' cellspacing='0' bgcolor='#999999' width='95%' align='center'>
<tr>
<td>
<a href="Default.htm">Home</a> |
<a href="bio.htm">Bio</a> |
<a href="Articles.htm">Blog</a> |
<a href="Pictures.htm">Pictures</a> |
<a href="links.htm">Links</a> |
<a href="contact.htm">Contact</a>
</td>
<td> </td>
</tr>
</table>
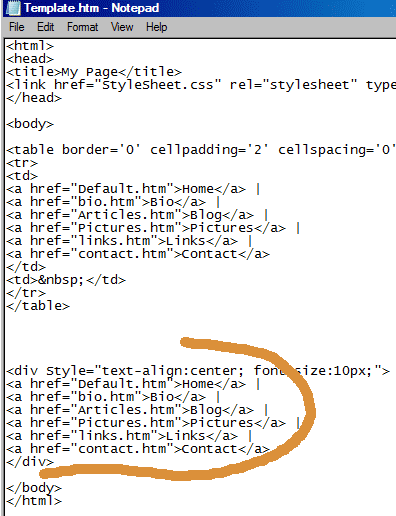
Links (from above) in a Bottom Navigation line
For the bottom navigation line we set up a division (<div>) and place the navigation text (from above) inside the <div> and </div> tags..
<div Style="text-align:center; font-size:10px;">
<a href="Default.htm">Home</a> |
<a href="bio.htm">Bio</a> |
<a href="Articles.htm">Blog</a> |
<a href="Pictures.htm">Pictures</a> |
<a href="links.htm">Links</a> |
<a href="contact.htm">Contact</a>
</div>
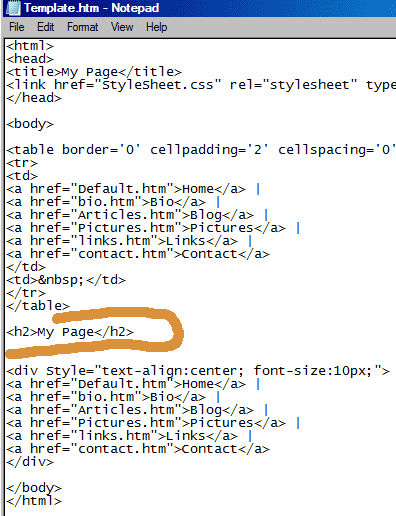
3 - Headline for the page
Across the top it helps to have some sort of headline. There are six headline tags, H1, H2, H3, H4, H5 and H6 with the largest headline as H1 and the smallest headline as H6. For this example we are using an H2 hed (Note: newspapers call a headline a "hed" - not an "head" - nothing like spelling)
<h2>My Page</h2>
4 - Creating a table to position text across the page
Tables are used a number of ways but they are also one of the earliest and simplest ways to arrange material on a page. The more recent methods using DIVs and absolute positioning also do this but they are a little touchy. Tables still make a good way to arrange text.
The basic table tags are <table></table>
Each row in a table is <tr></tr> - "tr" stands for table row
Each cell in a row is also a column. Each cell is a "td" (table data) tag: <td></td>
For cells without any content we generally include a "non-breaking space" special character " " otherwise tables in some browsers tend to look odd with some borders on and some borders off. All special characters start with an ampersand (&) and end with a semi-colon (;) - the text characters in between give us the value.
Although in our template we are placing table cell tags (<td></td>) on the same row, in practice we normall put the <td> on one line and the </td> on a line or so down and in the line between, we place all the contents for that cell (or column).
Example:
<tr>
<td>
<p>This is a paragraph placed in the cell.</p>
</td>
<tr>The Details of the Table for the Body Text
The table is OPTIONAL
Below is the main table structure we will be using for our content. This is not the only way to position items on a web page but it is fairly straight forward, has a lot of history and is not terribly difficult to implement.
I've added a couple of items to the table:
- width - sets how wide the table is in 1) pixels or 2) percent of page width if we include a percent sign % after the number - you can also use width as an attribute in a TD tag.
- border - sets the border size for table and cells. A zero (0) hides the border
- align - in the table tag sets how the entire table is placed left/center/right on the page - in a TR or TD tag sets how content within the cells is placed
- valign - vertical alignment - sets content placement as top/middle/bottom in the cells
- cellpadding - sets how many pixels between the walls of the cells and any content
- cellspacing - sets how many pixels between the cells.
- - non-breaking-spaces - in the table data cells. This prevents cells from losing their borders in tables in which the border attribute is greater than zero.
- <!-- .... column --> - comments - HTML comment markers (<!-- starts and --> ends a comment) allow us to put notes to ourselves or anyone working on the code. Browsers are designed to keep, but not show, these parts of the code. HTML comments generally consist of descriptions of functionality for some part of the page. They also allow us to hide ("comment out") various parts of the page without losing that part, so that we have it either 1) for reference, 2) for use later by removing the comment markers or 3) for in-page code backup when we are trying things. Comment markers may not be nested (don't place comment markers inside each other, it doesn't work).
- (number of rows, TRs) - As shown there are five rows. You probably won't need so many. You can delete some of them or add some rows. Up to you.
The code below is code for the structure of a table as a template.
<table width="700" border="0" align="center" cellpadding="5" cellspacing="0">
<tr valign="top">
<td> <!--1st column-->
</td>
<td> <!--2cd column-->
</td>
<td> <!--3rd column-->
</td>
</tr>
<tr valign="top">
<td> </td>
<td> </td>
<td> </td>
</tr>
<tr valign="top">
<td> </td>
<td> </td>
<td> </td>
</tr>
<tr valign="top">
<td> </td>
<td> </td>
<td> </td>
</tr>
<tr valign="top">
<td> </td>
<td> </td>
<td> </td>
</tr>
</table>
Ready-to-go Code and a Break-Out with Explanation
A ready-to-go (almost) file with template code can be downloaded here and rename the file to remove the ".txt" on the end. (as you download the file, change the filename from "Template.htm.txt" to "Template.htm")
Below is a block diagram showing the parts of the template file with
<html> Starting Tag for HTML document
<head>
<title>Simple Template for HTML</title>
<link href="StyleSheet.css" rel="stylesheet" type="text/css">
</head>
Head section:
Is not shown to the user but is used for data by search engines
<body bgcolor="#FFFFFF"> Starting Body Tag - Everything in the Body is viewable
<blockquote> An old fashioned (but still usable, if deprecated) way of indenting a block of text, as if for a quote, which is where it gets its name.
<h2>Mike Strong's Template Page</h2> A heading line (H2)
<table border='0' cellpadding='2' cellspacing='0' bgcolor='#999999' width='95%' align='center'>
<tr>
<td>
<a href="Default.htm">Home</a> |
<a href="bio.htm">Bio</a> |
<a href="Articles.htm">Blog</a> |
<a href="Pictures.htm">Pictures</a> |
<a href="links.htm">Links</a> |
<a href="contact.htm">Contact</a>
</td>
<td> </td>
</tr>
</table>The top set of navigation links. Here they are contained within a table having a single row of cells.
Note that they are all contained within a cell within the table.
Note also that each link is on a separate line and the vertical bars "|" used a item separators are at the end of all but the last item. When you see these on the page they display in a single horizontal line (unless you have a lot of these and then they may wrap around to the next line or more)
Having each link on its own line makes it easier to edit to add or remove items. Part of that is being able to see each item clearly.
<h1>This is my Headline</h1>
<p>This is a paragraph which allows sets of sentences in text to be separated by a blank line.</p>
<p>This is a 2cnd paragraph which allows sets of sentences in text to be separated by a blank line.</p>
<p>This is a 3rd paragraph which allows sets of sentences in text to be separated by a blank line.</p>
<p>This is a 4th paragraph which allows sets of sentences in text to be separated by a blank line.</p>
Basic Page Structure
with
Headings
and
Paragraphs<table width="700" border="0" align="center" cellpadding="5" cellspacing="0">
<tr valign="top">
<td> <!--1st column-->
</td>
<td> <!--2cd column-->
</td>
<td> <!--3rd column-->
</td>
</tr>
<tr valign="top">
<td> </td>
<td> </td>
<td> </td>
</tr>
<tr valign="top">
<td> </td>
<td> </td>
<td> </td>
</tr>
<tr valign="top">
<td> </td>
<td> </td>
<td> </td>
</tr>
<tr valign="top">
<td> </td>
<td> </td>
<td> </td>
</tr>
</table>The table allows us to position text in three columns and several rows.
CONSIDER THIS TABLE AS OPTIONAL
If you are having trouble understanding how to use the table section in the body of the text - Just don't use the table.
The table, as used for text arrangement, is not required for this course. It is not quite "going beyond" but it is close.
<p> </p>
<p> </p>These paragraphs tags are really just spacers. The stands for NonBreaking SPace
</blockquote> End tag for the indentation
<div Style="text-align:center; font-size:10px;">
<a href="Default.htm">Home</a> |
<a href="bio.htm">Bio</a> |
<a href="Articles.htm">Blog</a> |
<a href="Pictures.htm">Pictures</a> |
<a href="links.htm">Links</a> |
<a href="contact.htm">Contact</a>
</div>The bottom set of navigation links. Here they are not within a table but rather on an open line of text. Note the font-size style command. This creates a small size font.
Note the lines are an exact copy of the lines from above. When you have links like this which must be manually edited for each and every document it is a good idea to have a separate text file with these links so that you can change that file and then copy from the separate file and paste into the fixed HTML files you are changing.
</body> Ending Body tag - This marks the end of visible content on the page
</html> Ending HTML tag. This marks the official end of the HTML page
To create the other pages
Make changes to - and Save As ...
The <title></title> tag section to show your name and the page purpose
The headline to show your name and the page purpose
<title>Mike Strong - Template for HTML</title>
Change this to your name and the name of the page
such as:
<title>Jane Doe's Home Page</title><h2>Mike Strong's Site Template Page</h2>
Change this to your name and to any headline you want across the page top
such as:
<h2>Welcome to Jane Doe's Website</h2>You might notice that I put a "Welcome" at the start of the headline and not in the title area. Remember, the title area will be used as a menu item in web browsers and as a search item. So get right to the identification, don't start with "Welcome..". or "The .." anything which doesn't allow someone to find it again easily in their lists of bookmarks / favorites.
Then Save the File as one of the following filenames for your site, one after the other. Once you've finished you will have a full set of pages which link to one another. Nothing in them yet. But they will work. Think of them like a newly built house that you can now furnish with content.
Here is the list of page names to create:
Default.htm
- Change this to your name and the name of the page
such as: <title>Jane Doe's Home Page</title>- Change this to your name and to any headline you want across the page top
such as: <h2>Welcome to Jane Doe's Website</h2>- Save as ... "Default.htm"
Bio.htm
- Change this to your name and the name of the page
such as: <title>Jane Doe's Bio</title>- Change this to your name and to any headline you want across the page top
such as: <h2>Jane Doe's Story </h2>- Save as ... "Bio.htm"
Articles.htm
- Change this to your name and the name of the page
such as: <title>Jane Doe's Blog Page</title>- Change this to your name and to any headline you want across the page top
such as: <h2>Jane Doe's Blog </h2>- Save as ... "Articles.htm"
Pictures.htm
- Change this to your name and the name of the page
such as: <title>Jane Doe's Home Page</title>- Change this to your name and to any headline you want across the page top
such as: <h2>Jane Doe's Selected Pictures</h2>- Save as ... "Pictures.htm"
Links.htm
- Change this to your name and the name of the page
such as: <title>Jane Doe's Links Page</title>- Change this to your name and to any headline you want across the page top
such as: <h2>Jane Doe's Favorite Links </h2>- Save as ... "Links.htm"
Contact.htm
- Change this to your name and the name of the page
such as: <title>Jane Doe's Contact Page</title>- Change this to your name and to any headline you want across the page top
such as: <h2>Contact Jane Doe's</h2>- Save as ... "Contact.htm"
Blank.htm
- Change this to your name and the name of the page
such as: <title>Blank Page</title>- Because this one is a space filler page you can delete all the content between the <body> and the </body> tags.
- Save as ... "Blank.htm"
All of the pages above will work from your browser in your local folder.
Now you are ready to put content into the pages.
At this point, you can use a WYSIWYG editor, if you have one.
Transfering Your Files To Your Website Space Using FTP ("file transfer protocol" program)
Before you can do anything with your files you need to know 1) Where your files are located and 2) How to get to them to edit and upload. The where and the how are directly affected by whether you are working from campus or from home/or/work. Read these files:
Location Your Files' Locations - Basic File locations along with methods for FTP including FileZilla
Using FileZilla FTP Application - Simpler page showing how to use FileZilla for FTP file transfers